Getting Started
Step 1 — Log in on any device
Use your provided login information to access Z-Commerce on Google Chrome (recommended), Microsoft Edge, Internet Explorer 11 or above, Mozilla Firefox or Safari.
STEP 2 — Select a store
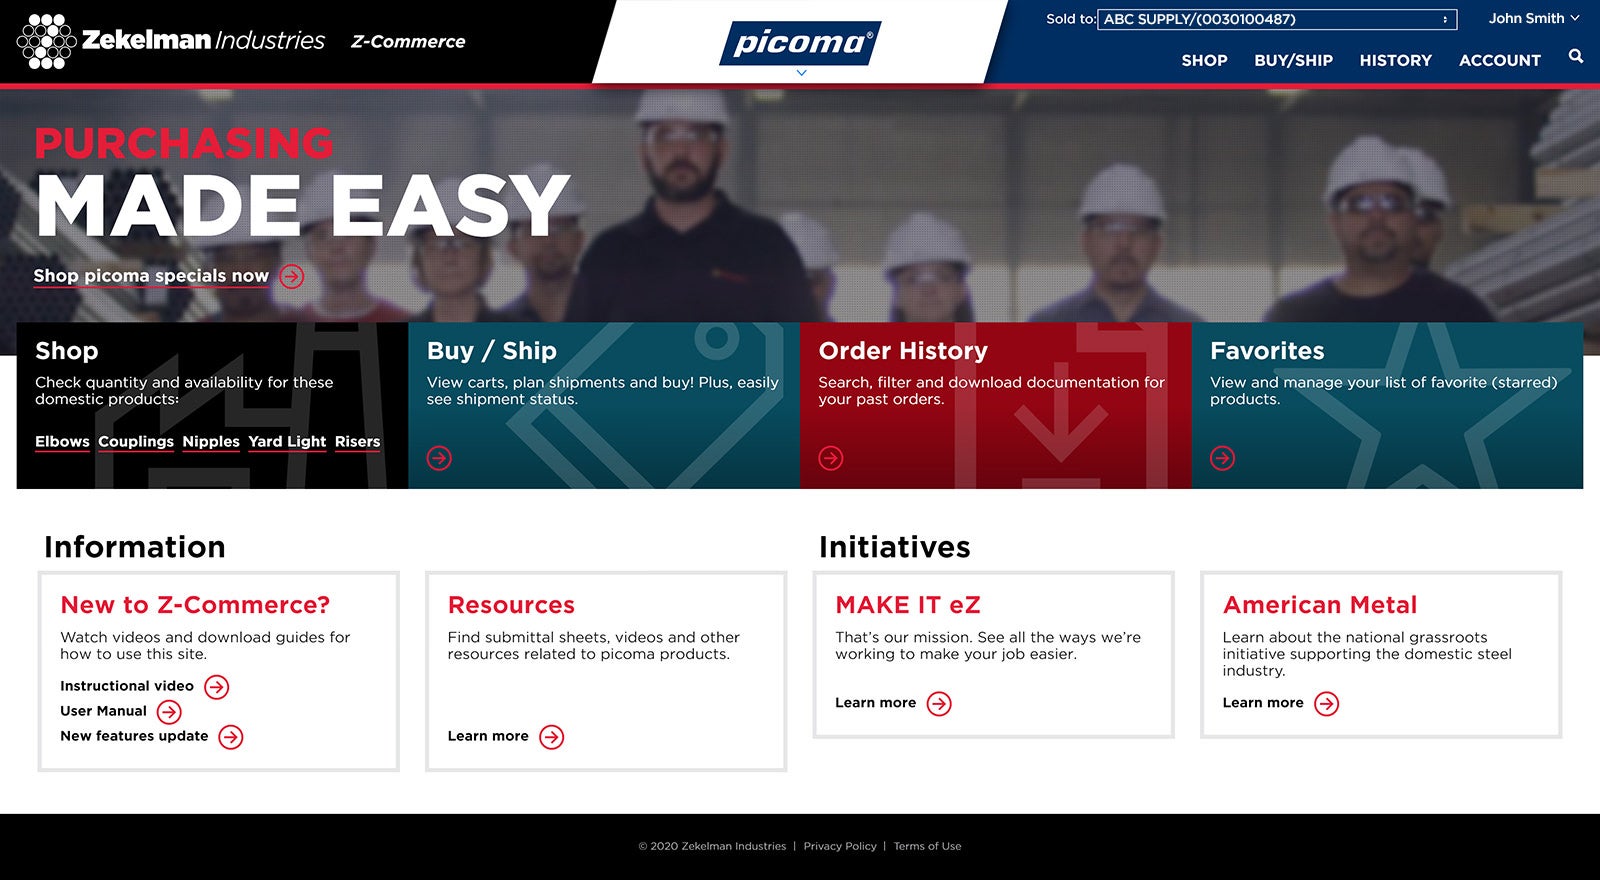
Click the Picoma logo to shop for Picoma EC&N products.Tip: Select “Set as default” to automatically land on the Picoma store next time you log in.
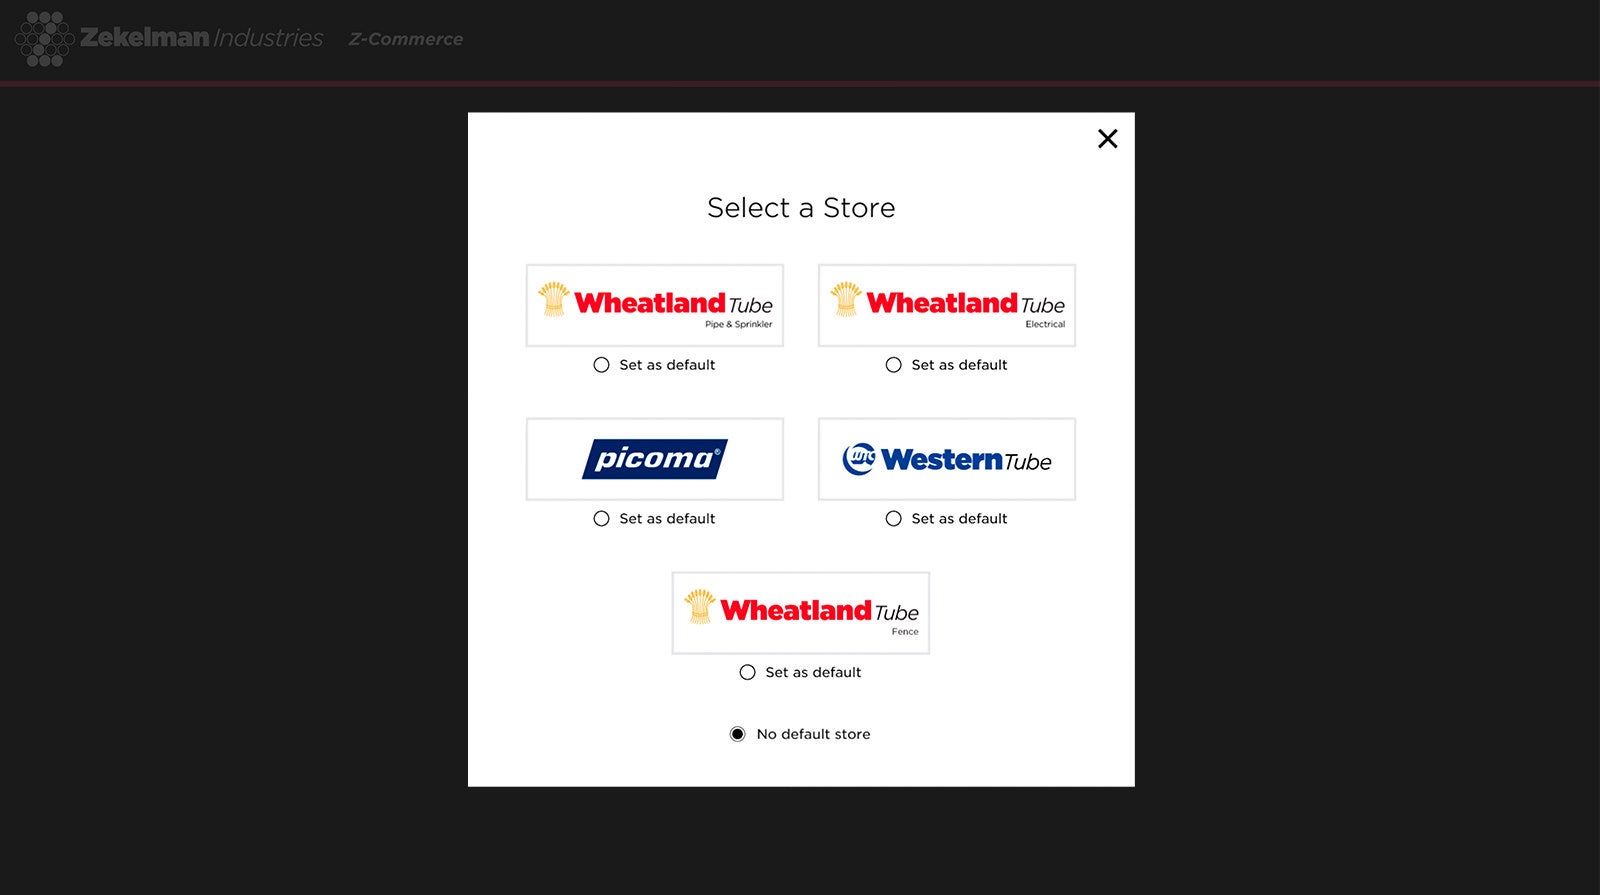
If you need to change stores, click the logo at the top center of your screen to open the store selector again.
Step 3 — Change your password (recommended)
Click on your name in the upper right-hand corner of the screen, then click on “User Account.” You’ll find instructions here for resetting your login password.Tip: Your new password must be at least 8 characters long, include one upper case letter, one lower case letter, and one number.
Step 4 — Create favorites lists
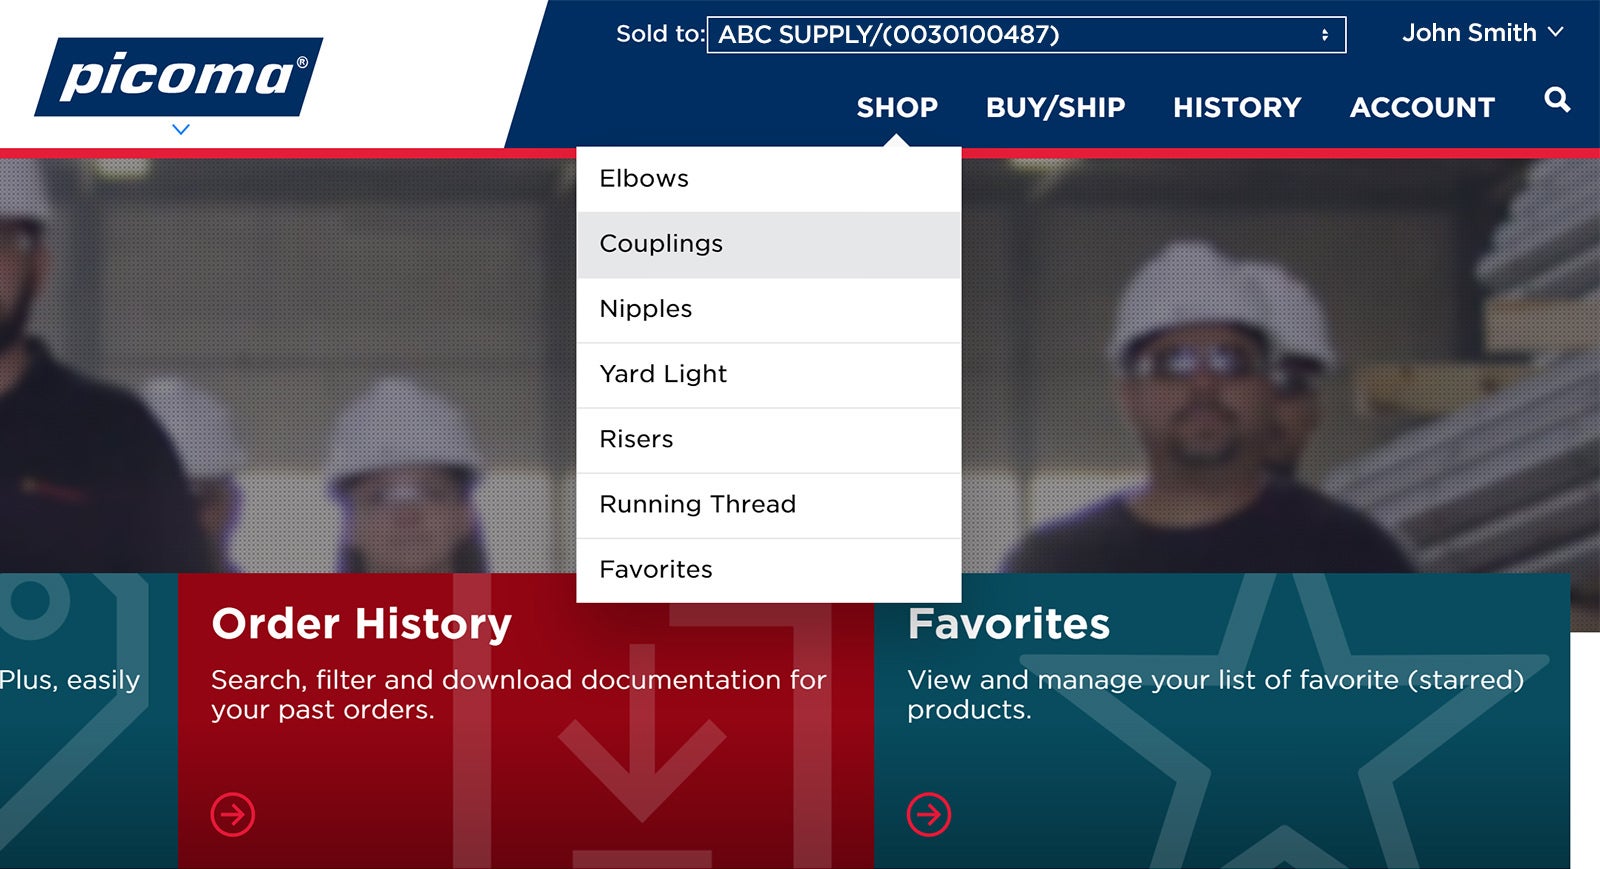
To save time finding products, create a favorites list so you can quickly see all your most commonly purchased products. This way, you don’t have to search for your top-selling products every time you want to check pricing and availability or place an order.First, find the products you want to add to your favorites list by selecting the product type under “Shop” in the main navigation.
Then, use the expandable filters on the left to narrow down to the exact product you’re looking for. You can filter by individual product features like material type and size or use the bundled “Quick Filters” to view Picoma's most popular products. Quick filters are combinations of filters that get applied all at once when selected.
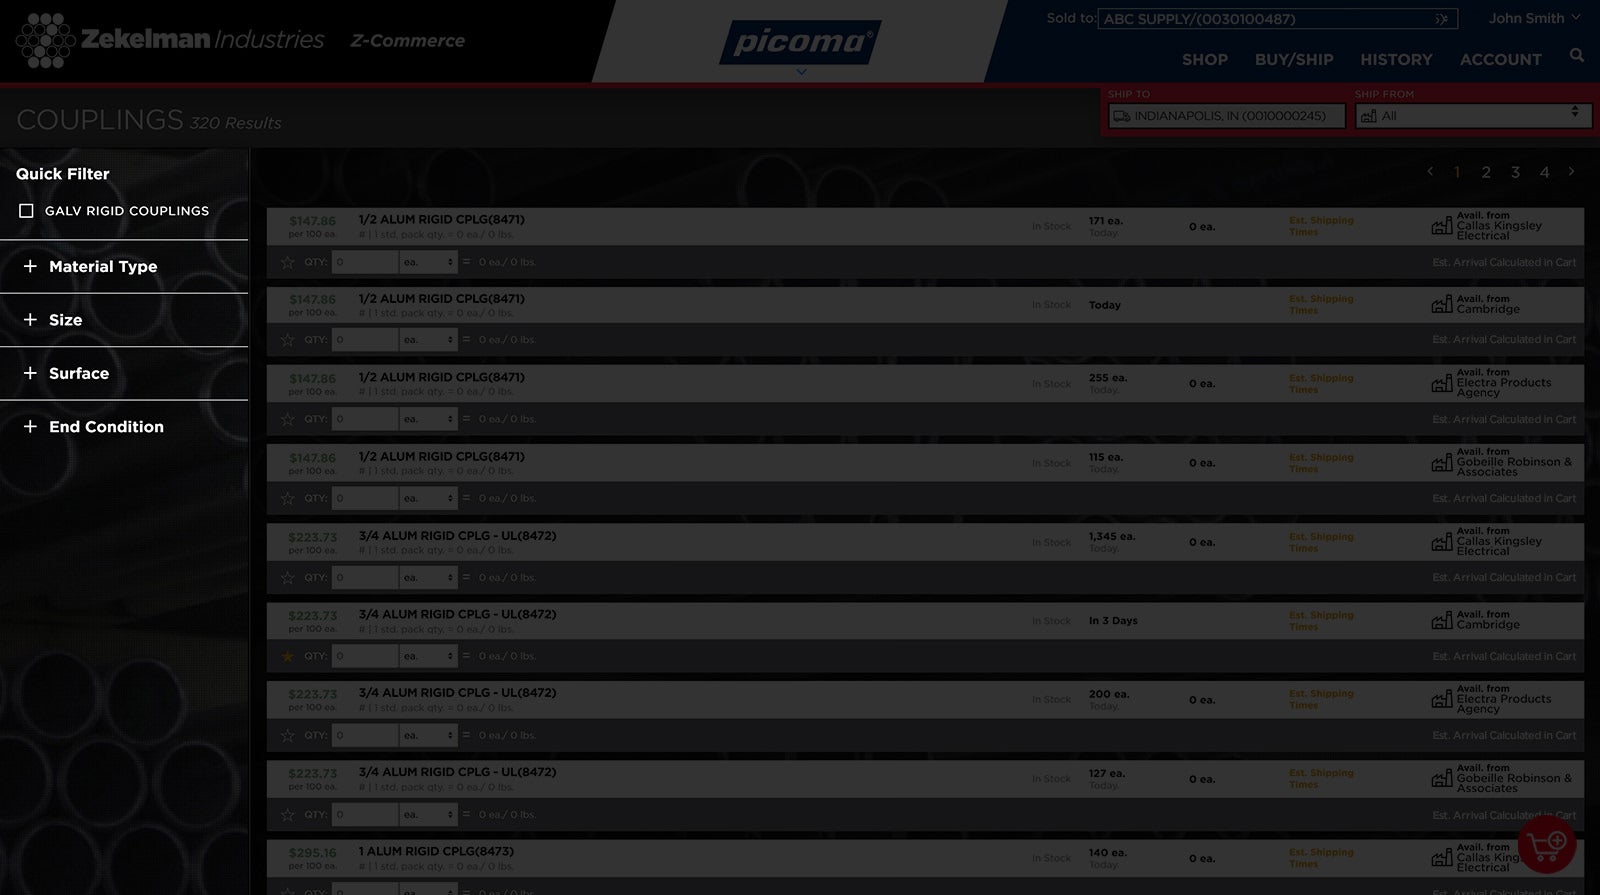
Any filters you select will be listed beneath the product type and number of results near the top of the page.
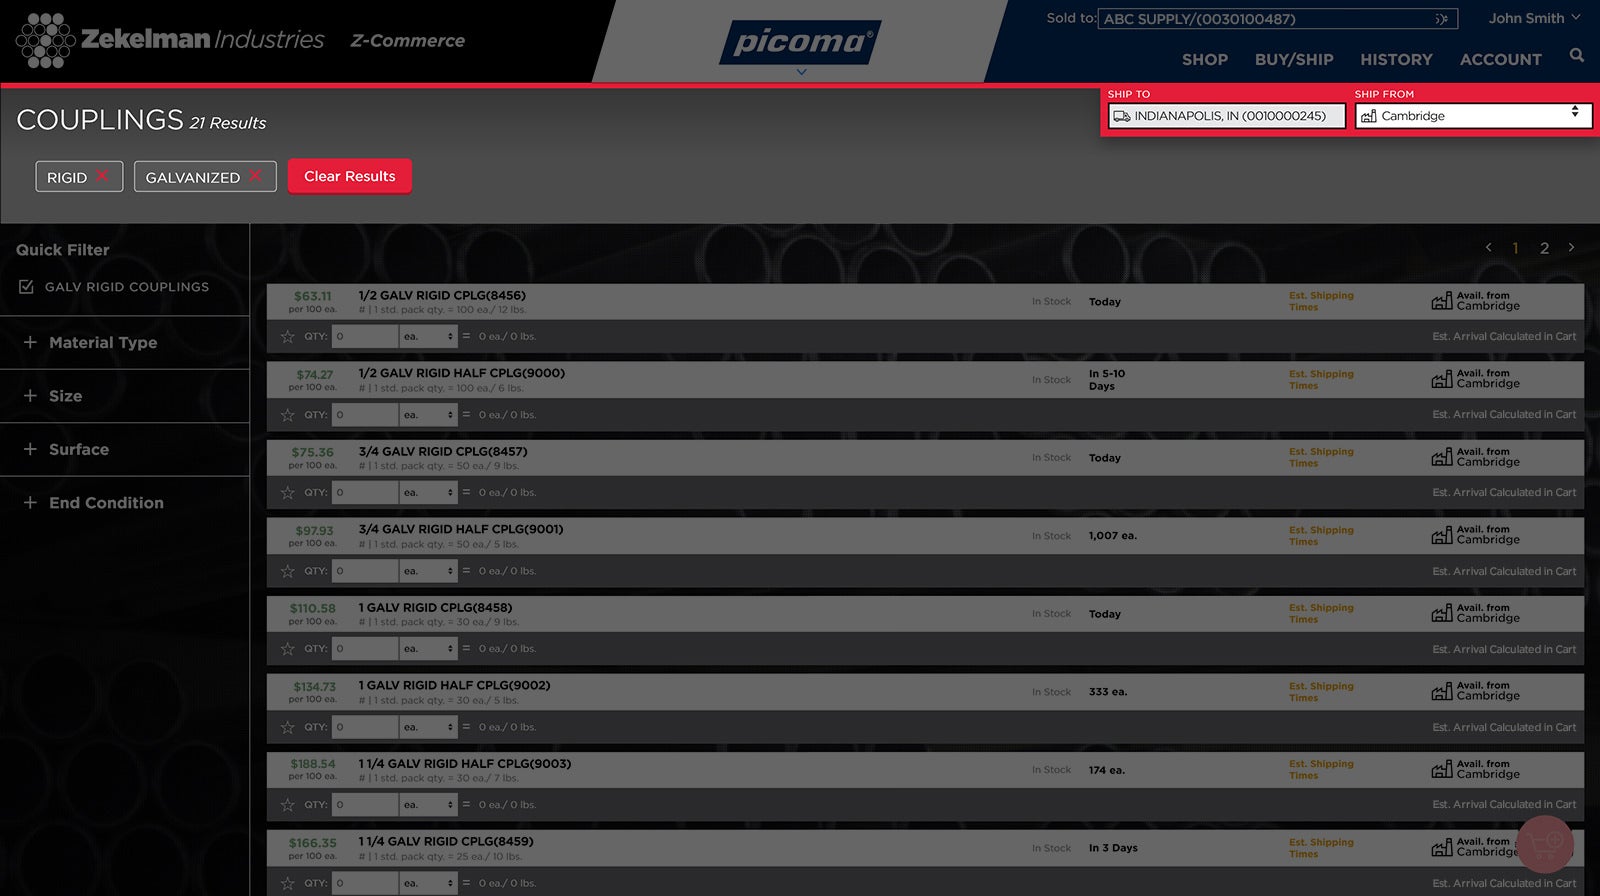
Tip: You can remove any selected filters by clicking the red “X” next to each parameter, and you can remove all filters by clicking “Clear Results.” Notice that each individual product is listed multiple times in the results. This is because the product can ship from either the Picoma mill or from a local stocking warehouse. When adding a product to your favorites, be sure to select the line item with the appropriate stocking location listed at the far right. Or, add all line items for that product to your favorites so you can quickly see pricing and availability for all locations the product can ship from.
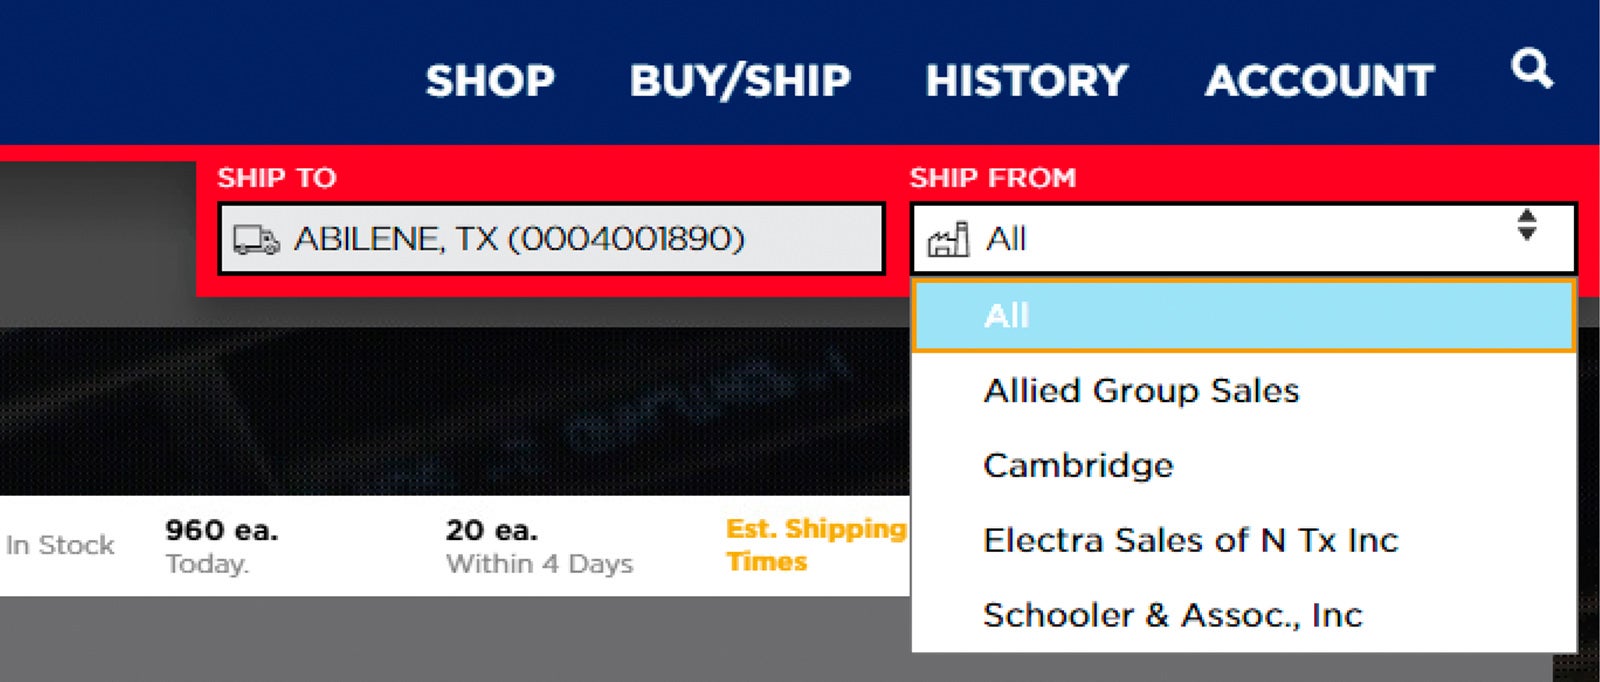
To narrow down by the location the product will come from, use the “Ship From” dropdown in the red bar to select a mill or local stocking warehouse.
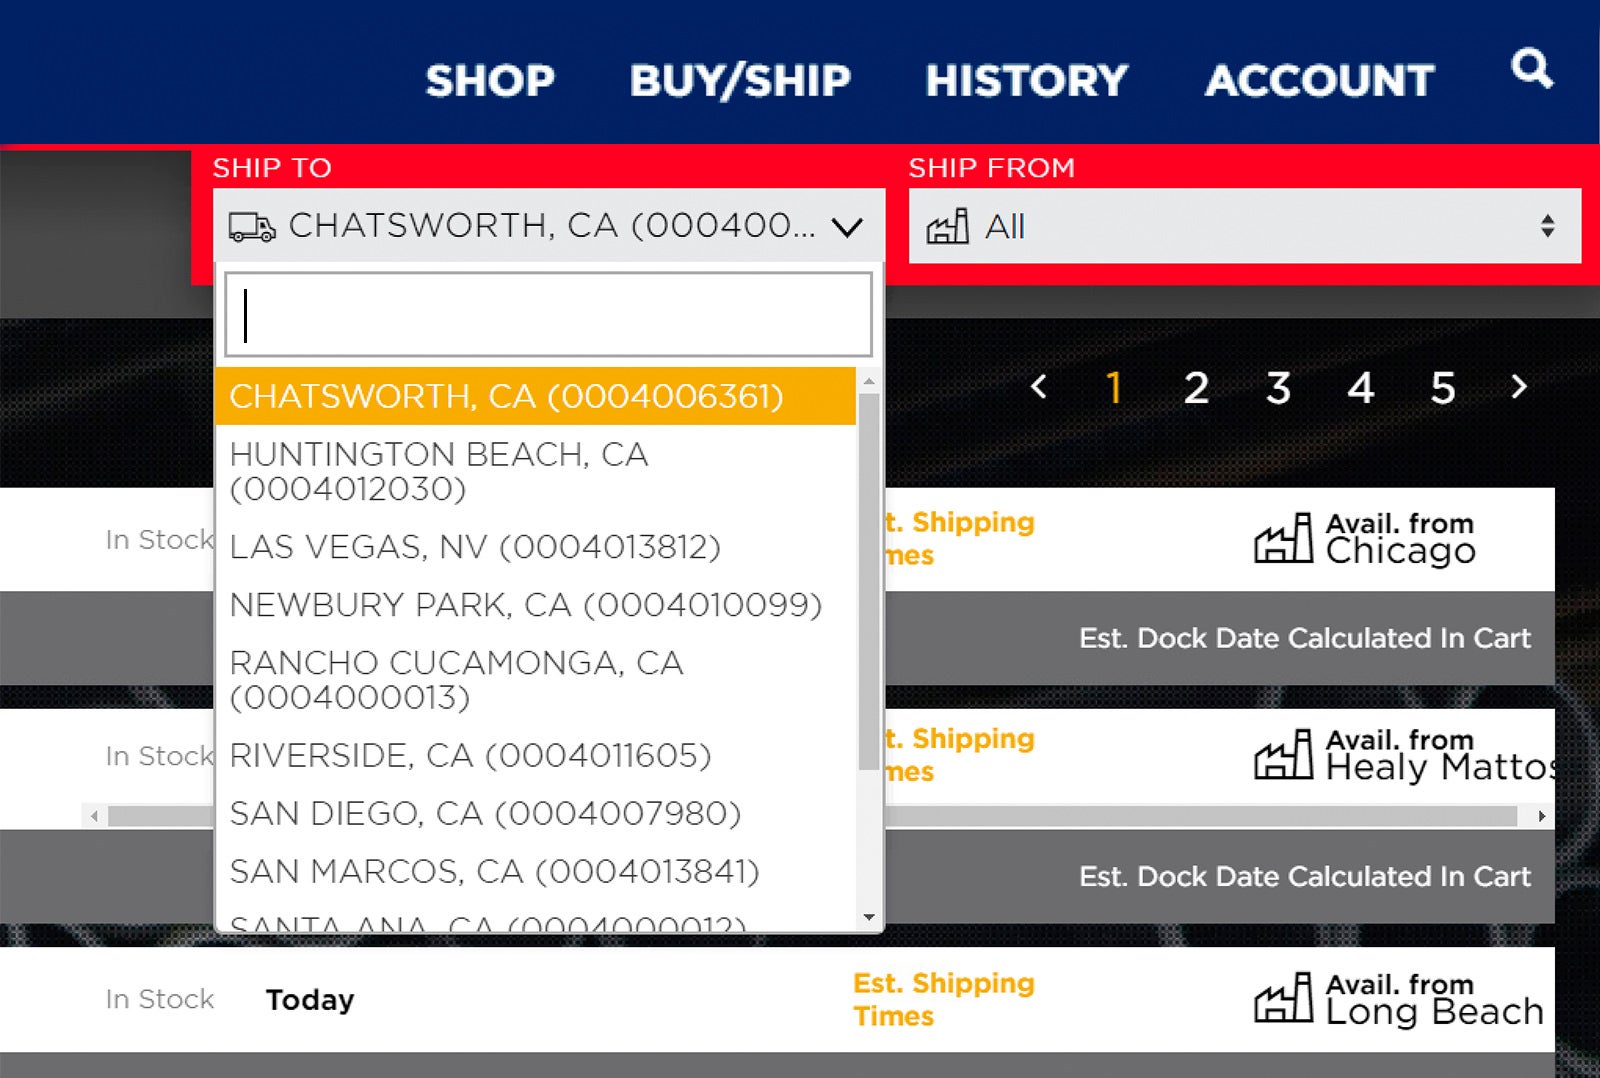
Tip: You can also select a branch location from the “Ship To” dropdown in the red bar if you have multiple branches. This isn’t required when adding items to your favorites, however, because you will see the same products in your favorites list for all your branch locations. Once you’ve found the desired product with the appropriate stocking location, click the icon in the gray bar to add it to your “Favorites” so you can find it faster next time.

Once you’ve added products to your favorites, you can access your favorites lists under “Shop” in the navigation.
Tip: To remove a product from your favorites list, click the icon to deselect the item. Keep in mind that removing a favorite item removes it for all branch locations. Within each favorites list, you can change the view by branch location in the “Ship To” dropdown in the red bar. This will update real-time product pricing and availability for that branch.
You can also filter your favorites lists by stocking location. Use the “Ship From” dropdown in the red bar to select the Picoma mill or local stocking warehouse. If you leave the dropdown set to “All,” you’ll see availability for all locations.
Shopping
View and purchase products in your favorites list
Access your favorites lists under “Shop” in the navigation.

The product prices and availability may be different depending on which branch location you are viewing. Select the branch location you want to shop for in the “Ship To” dropdown in the red bar to see real-time pricing and availability for that branch.
You can also narrow down your favorites list by the location the product will come from by using the “Ship From” dropdown to select a mill or local stocking warehouse.
Tip: If you leave the “Ship From” dropdown set to “All,” you’ll see availability and pricing for all locations the product can ship from.Once you’ve made your selections for branch location (ship to) and mill or warehouse location (ship from), follow steps 4 and 5 outlined below to check product pricing and availability and add products to your cart.
Step 1 — Find products
Select the product product type under “Shop” in the main navigation to search for products.Tip: Once you find the product you’re looking for, add it to your “Favorites” by clicking the star icon so you can find it faster next time. Learn more about creating favorites lists so you can save time searching for products.
Step 2 — Select branch location and stocking location
Branch locationSelect the branch location you want to shop for in the “Ship To” dropdown in the red bar to see real-time pricing and availability for that branch.Tip: If your list of branch locations is extensive, you can search by the city name to narrow the list.
Stocking locationTo narrow your search by the location the product will come from, use the “Ship From” dropdown to select a mill or local stocking warehouse.Tip: If you leave the “Ship From” dropdown set to “All,” you’ll see availability and pricing for all locations the product can ship from.
Step 3 — Search for products
Use the expandable filters on the left to narrow down to the exact product you need. You can filter by individual product features like material type and size or use the bundled “Quick Filters” to view Picoma's most popular products. Quick filters are combinations of filters that are applied all at once when selected.
Any filters you select will be listed beneath the product type and number of results near the top of the page.
Tip: You can remove any selected filters by clicking the red “X” next to each parameter, and you can remove all filters by clicking “Clear Results.”
Step 4 — Check pricing and availability
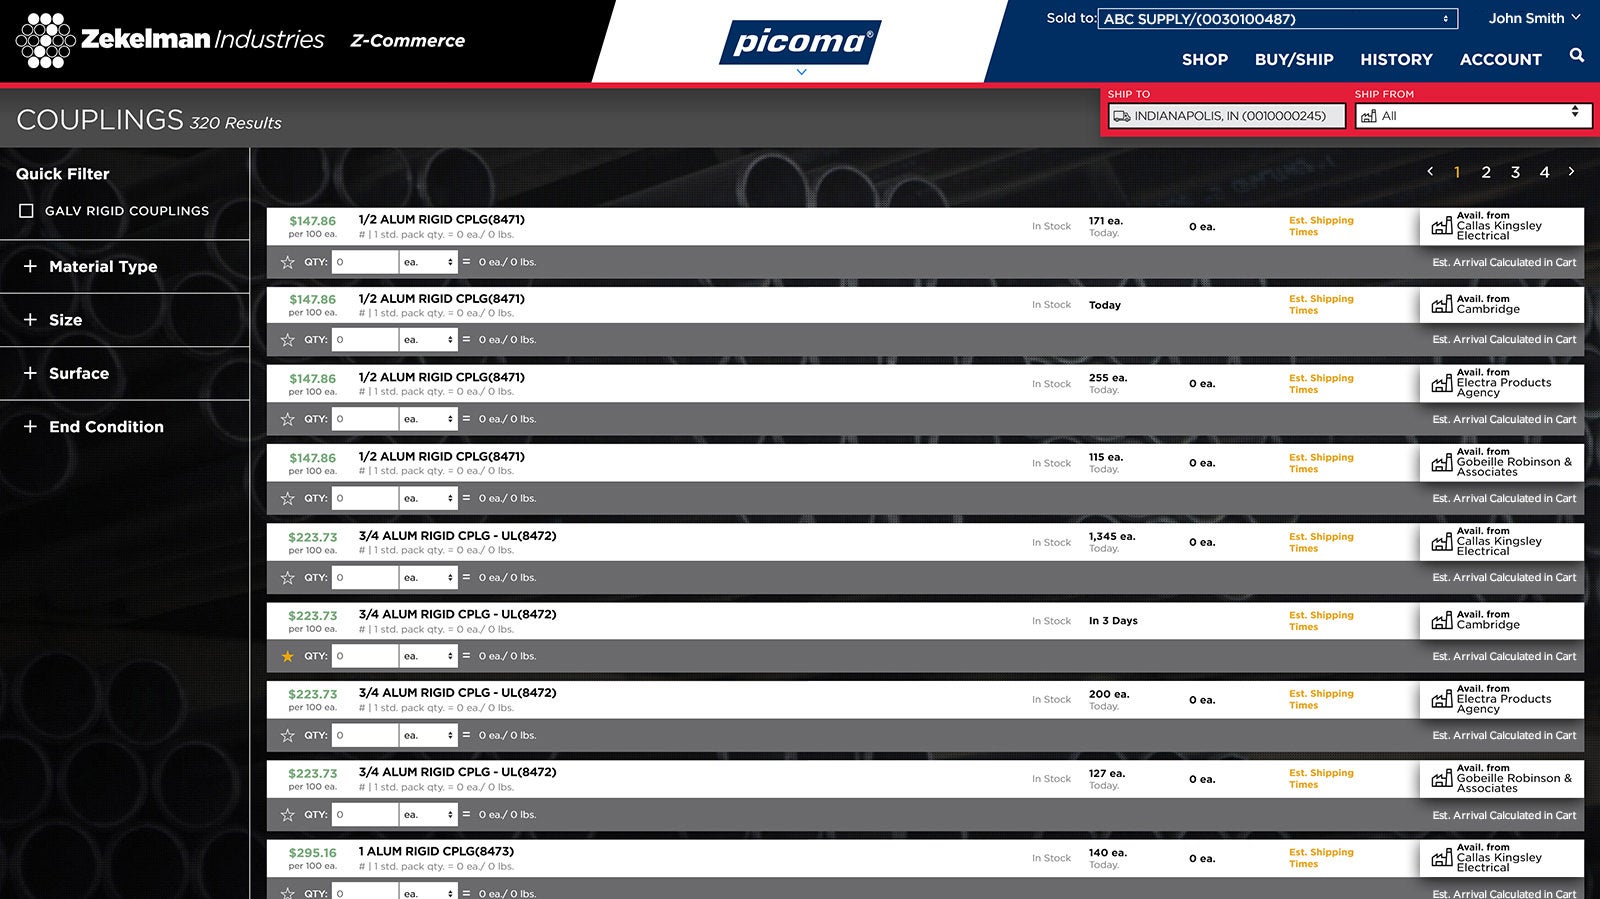
Once you’ve found the right product, you can see real-time pricing and availability. If you have the “Ship From” dropdown set to “All,” you will notice that each individual product is listed multiple times in the results. This is because the product can ship from either the Picoma mill or from your local stocking warehouse.
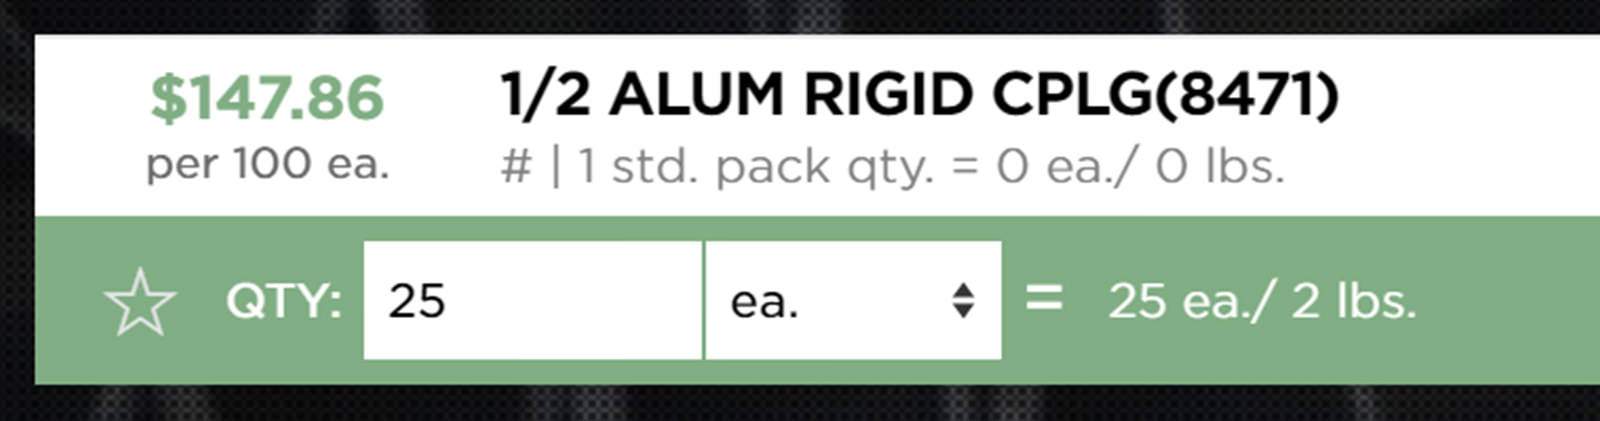
Tip: To narrow down by the location the product will come from, use the “Ship From” dropdown in the red bar to select a mill or stocking location. From left to right on each product line item, you’ll see the product price in green, the product description and standard pack quantity, in-stock dates and quantities, estimated shipping times, and the location the product is available from. In the gray bar beneath each product description, you’ll see the quantity entry field.

Tip: The prices you’ll see for all products is your standard pricing. If you have a job quote for a particular product, you’ll be able to see that job pricing in your cart when you select your price sheet. Products coming from the Picoma mill show whether the product is in stock today or when it is expected to be back in stock.

Products coming from warehouse locations show how much is in stock today and how much will be added soon.

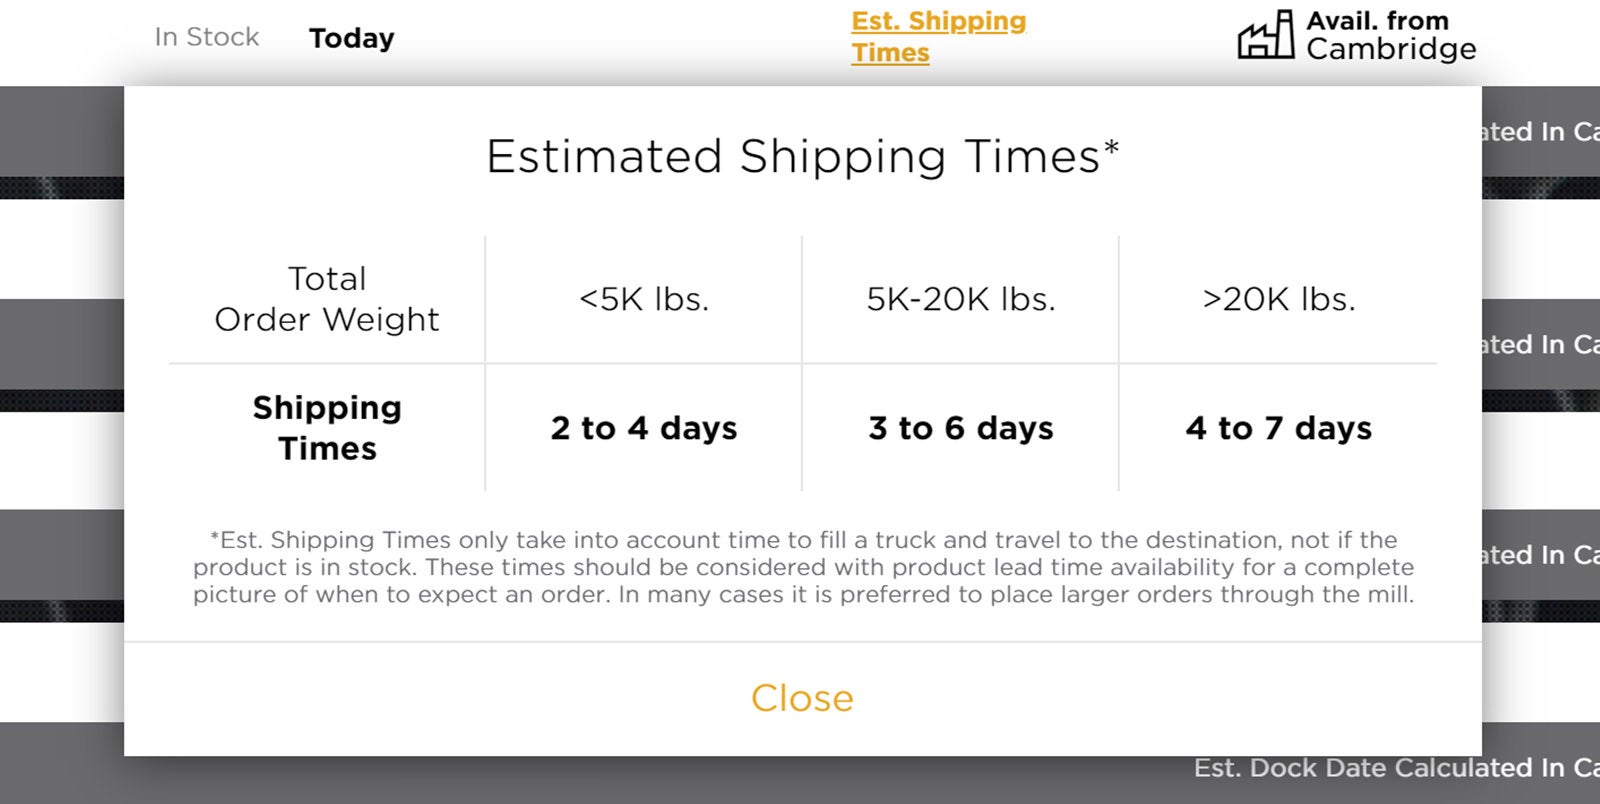
Tip: You can also check estimated shipping times for each product to help plan your purchases. Estimated shipping times refer to transit time only, based on the product being in stock. If the product is not currently in stock, the product’s availability lead time must be considered. Once you add items to your cart, you will see more specific information and estimated arrival dates in your cart details.
Add to cart
Enter the quantity for each product you want to order in the “QTY” field in the gray bar directly below the product name. As you shop for products, you can create multiple carts, giving you the ability to start and organize multiple orders at once.

When you enter the desired quantity, Z-Commerce will calculate the weight in pounds, and the row will turn green indicating that you can now add it to your cart.
Click on the red shopping cart icon at the bottom right corner of your screen to add all selected products (highlighted in green) to your cart at once. You can add to an existing cart or create a new one.
Tip: You can only add multiple products to your cart at once if they are all being shipped from the same location (either the Picoma mill or a local warehouse). If you try to enter quantities for products from different ship from locations, you’ll be prompted with an error message.
Build cart from PO (NEW!)
If you want to reorder products from a past PO, you can quickly copy that order to a new cart.Go to the "Buy/Ship" page in the main navigation and click the "Build cart from PO" button at the top right of the "Carts" section of the page. Enter the PO number you want to copy and click the "Create Cart" button. A new cart will appear on the page with the same items and quantities that were previously ordered under the entered PO number. You can modify the products and quantities in the cart and add additional products before purchasing the cart.
Tip: You can look up past orders in the "History" section. Learn more about order history.
Buying & Shipping
Manage your carts
After you’ve added items to your cart, navigate to the “Buy/Ship” page where you can view carts, finalize quantities and place orders.To see each cart’s contents or make quantity changes, click on the icon to expand the cart and see details.
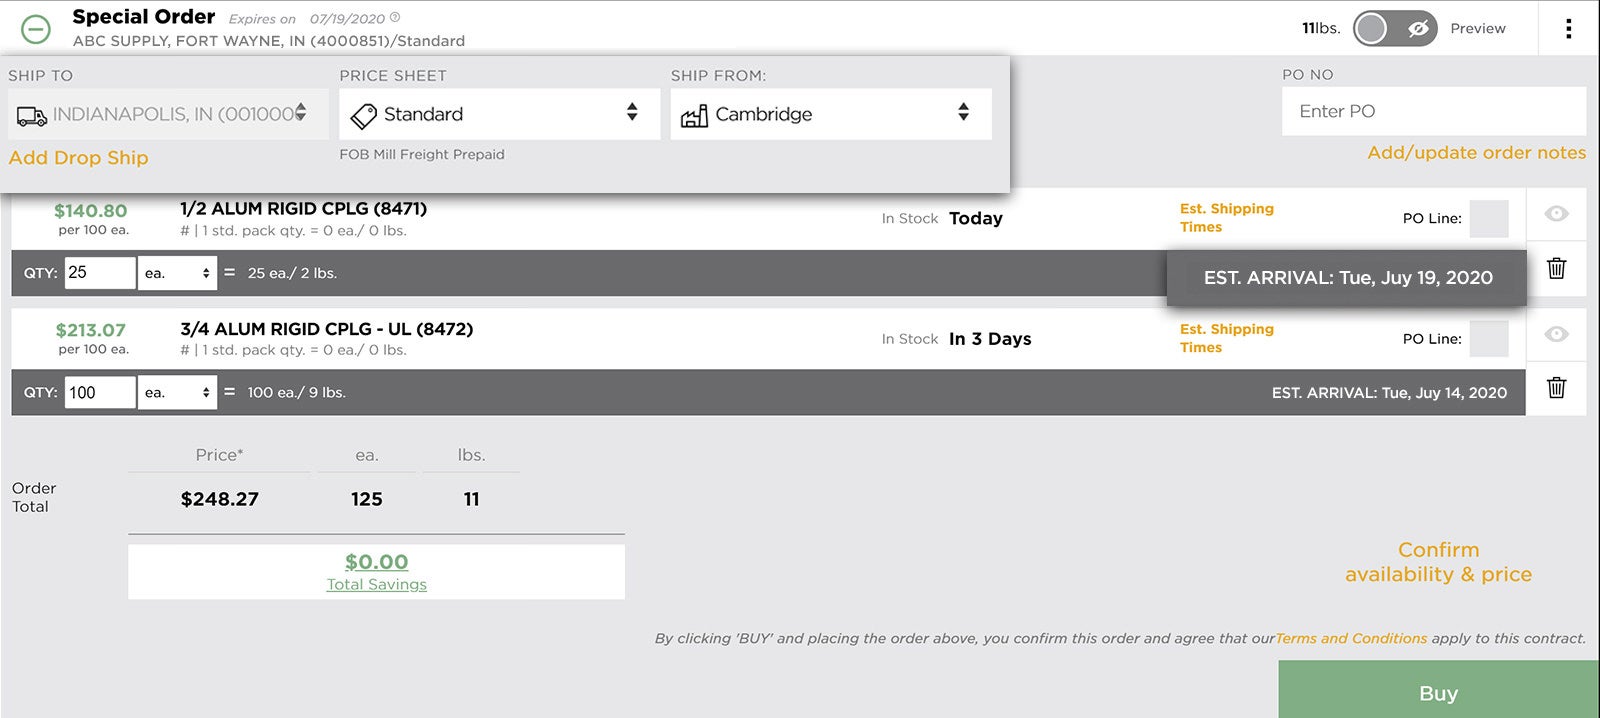
In each cart, you’ll see the ship to location, price sheet, and ship from location near the top of the cart. These settings apply to the entire order. While you can’t change the branch location (shown in the ship to dropdown) within your carts, you can change the price sheet and ship from location. If you change the ship from location, you may see changes to the estimated arrival dates based on current stock levels for that location. Changing the price sheet will adjust the prices listed for all products the price sheet applies to. Learn more about selecting your price sheet.Below that, you’ll see all the products in the cart. You can edit quantities here before you place your order. At the right side of each product listed, you’ll see the estimated arrival date in the gray bar. This is the date the product is scheduled to arrive at your location.
At the bottom of your cart, you'll see your order total shown in terms of price, number of pieces and weight. It is important to take note of te total price of your order because there is a minimum order amount required for pre-paid shipping.
Pre-paid shipping applies to fittings orders of $750 or more when shipping in the United States (excluding Hawaii) and $500 or more when shipping to Canada. For fittings orders under those amounts, you will be prompted to provide carrier information and pay for shipping costs at checkout or pick up the order. (There is a $100 minimum order amount for fittings.)
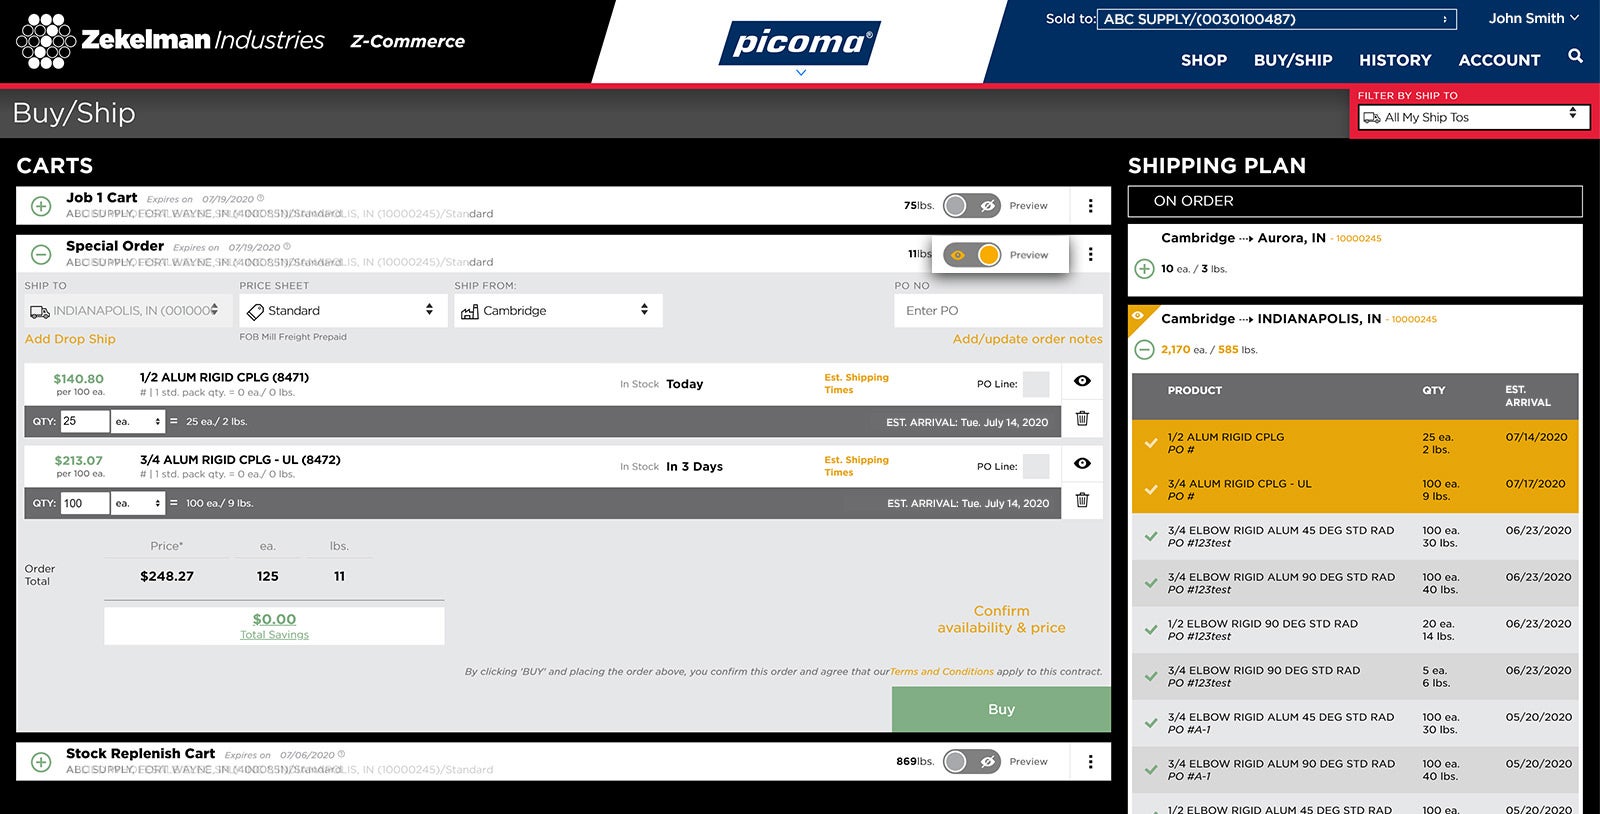
Preview orders
To see the where items in your cart will land in the shipping plan, click “Preview” on any of your carts. This will show you when these items are expected to arrive in relation to other items that are currently on order.
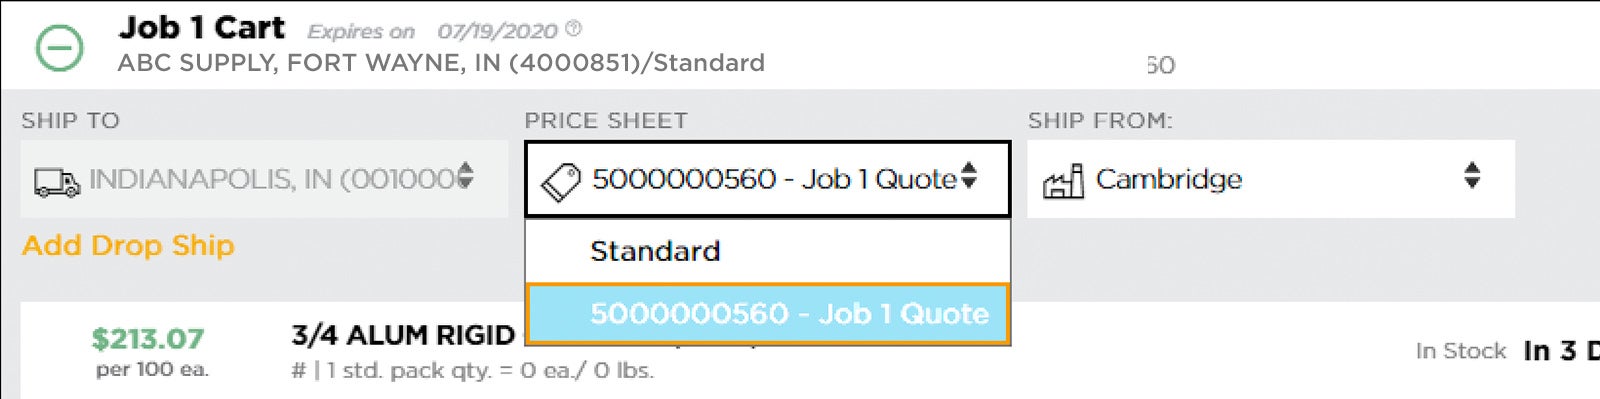
Select price sheet
If you have a job quote for a particular order, you can select your contract price sheet from the dropdown menu in your cart. Contract pricing will be applied to all qualified products in your cart and will be marked with a “Job” flag.
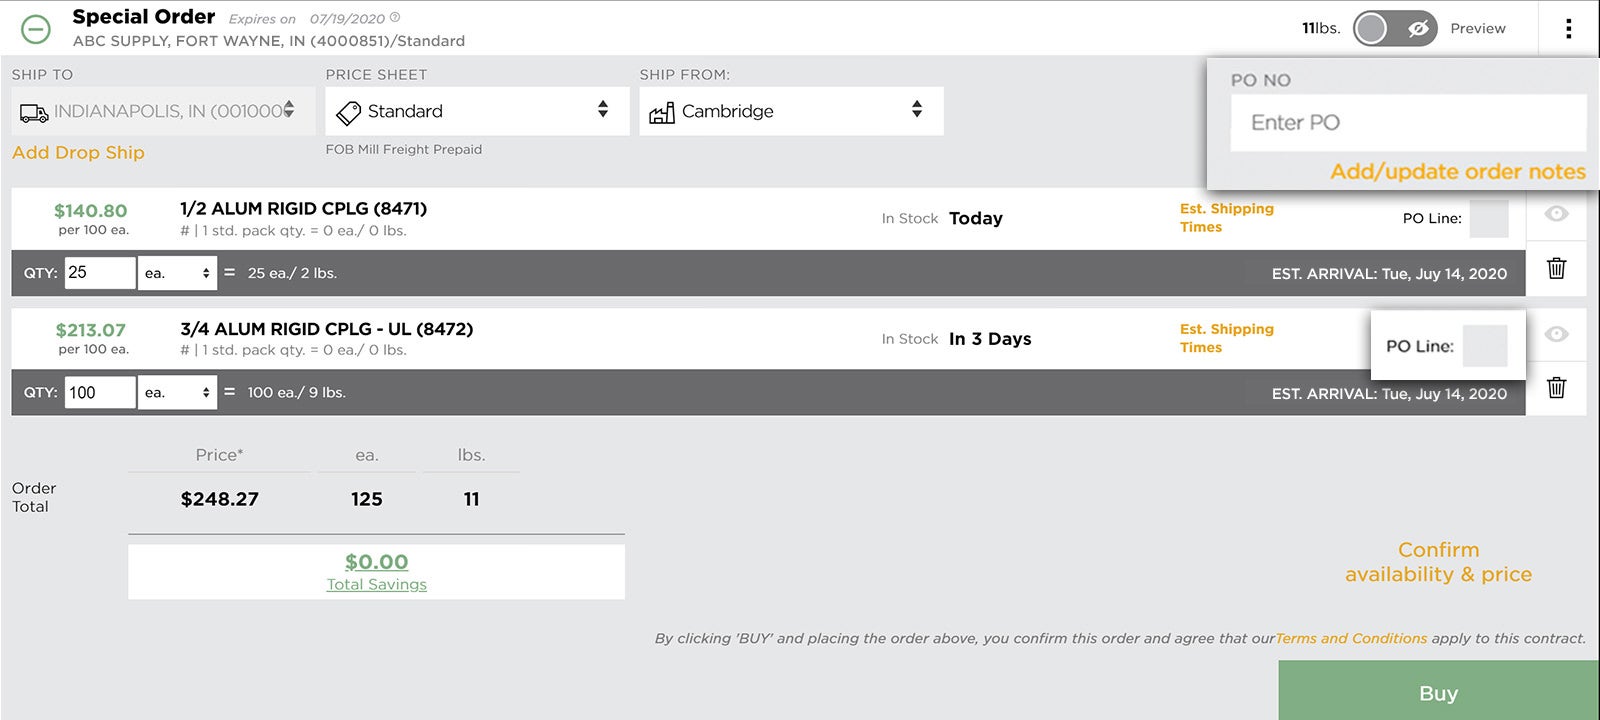
Enter PO number
Enter a PO number in the field near the top of the cart (required to make a purchase) and enter order notes for your CSR (optional). Each line item in the cart can be identified with a PO line on the purchase order for the cart (optional).
Add a drop ship location
Click “Add Drop Ship” to enter a drop ship location and ship the order directly to a job site. The drop ship location will apply to the entire cart, and the location must be in the same state as the “Ship To” location you selected. (A single order cannot be shipped to multiple locations.)
Tip: When you enter and save a drop ship location for a cart, you’ll see a gray “Drop Ship” flag with the drop ship address under the name of the cart. This information will carry through after you place the order and will be visible when your order moves from “Carts” to “Open Purchases.”
Confirm product availability
Before completing a purchase, click “Confirm availability” to run a real-time check against current stock and future capacity. Availability updates will be noted in red.
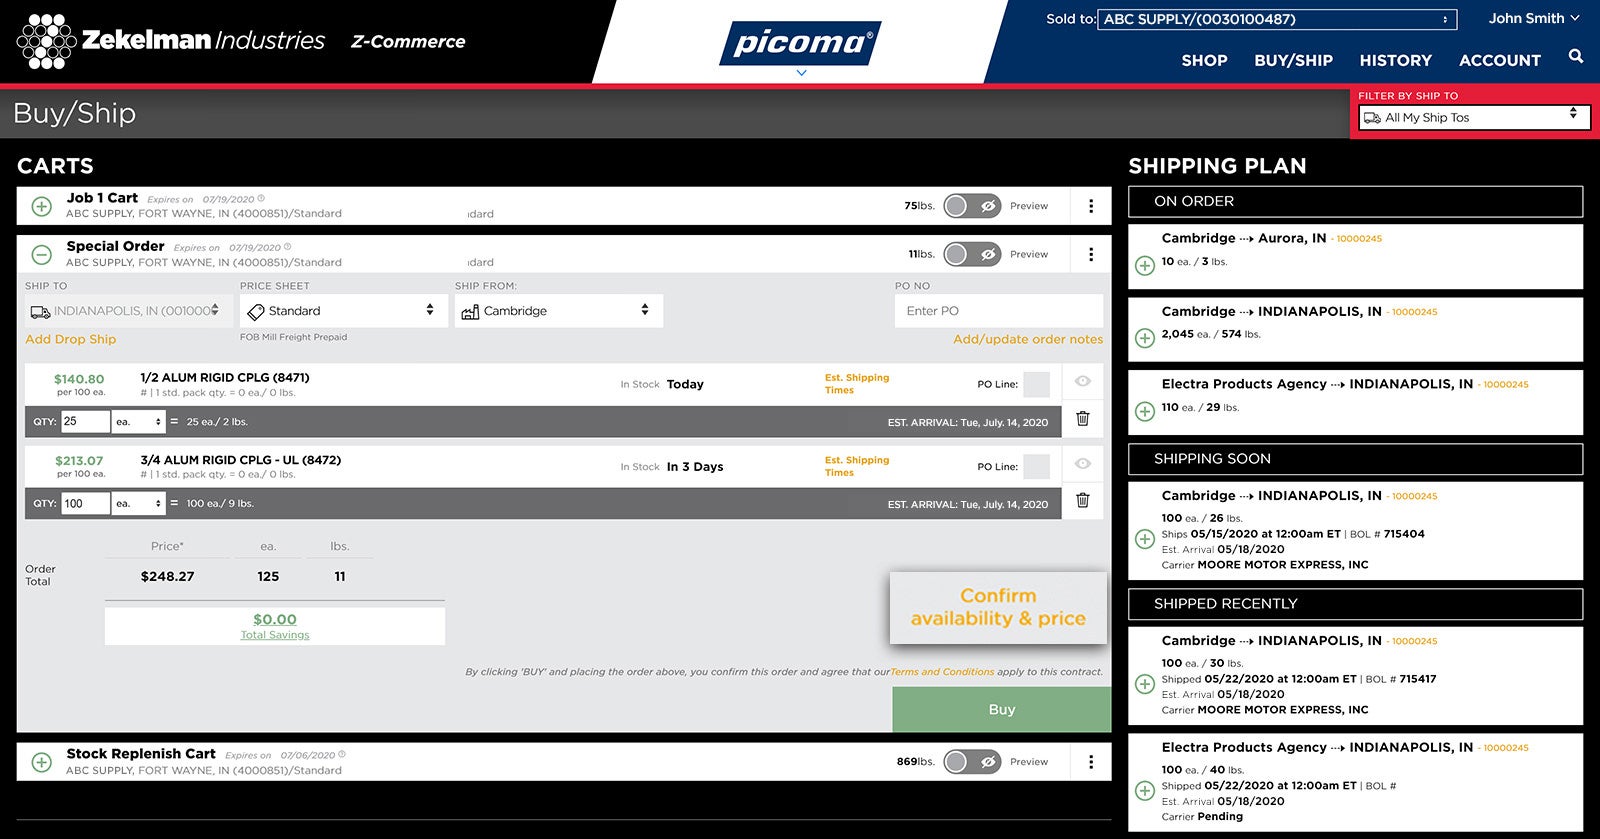
Buy products in a cart
Click the “Buy” button to purchase products in a cart. Once you click “Buy,” the cart will automatically scroll down to “Open Purchases,” where purchases are grouped by PO number. An order confirmation email will also be sent to the email address associated with your Z-Commerce account.
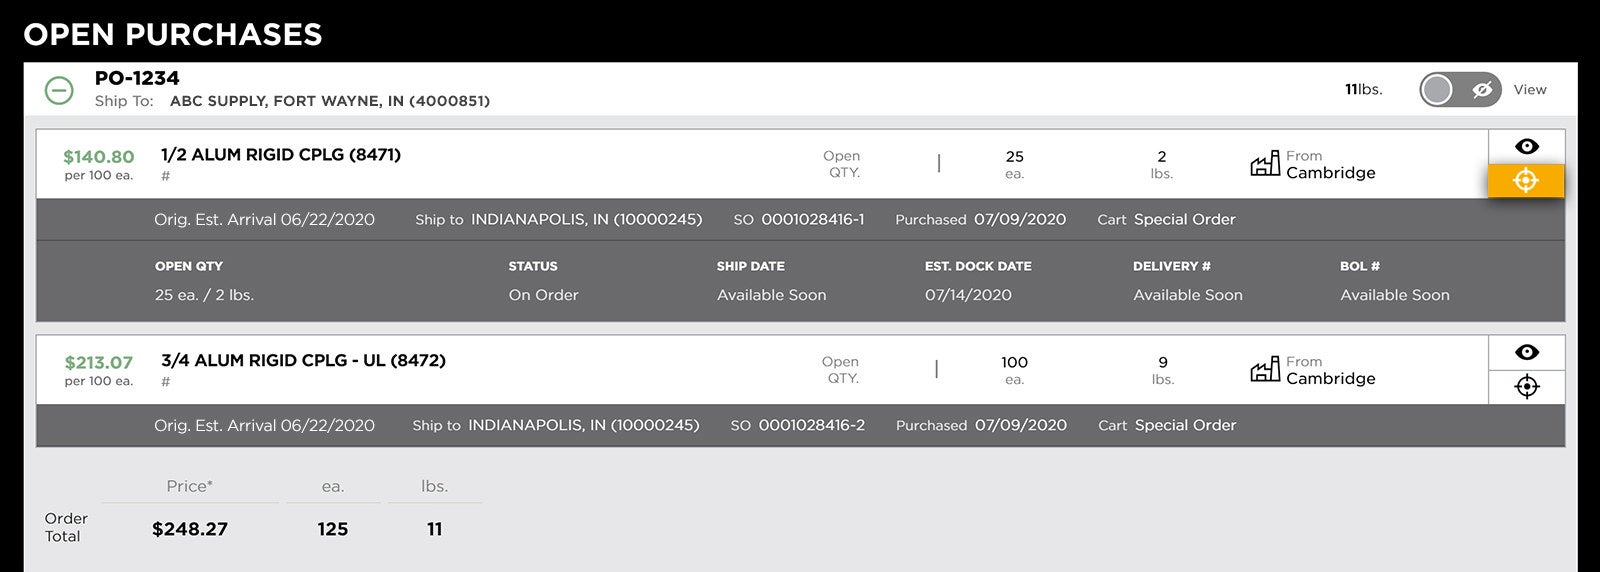
View open purchases
Once you’ve clicked “Buy,” your page will automatically scroll down to “Open Purchases,” where you can view your recent orders grouped by PO. Note that all your recent orders will be visible here, not just orders placed with Z-Commerce. To view details on any of your submitted orders, click the icon on the left to expand the order and see more information. Note that all your recent purchases will display here, not just those placed in Z-Commerce.
To expand a product line item within the order and see more information, click the icon on the right.
Move or delete carts
To delete a cart or move contents to another cart, click the three-dot menu icon at the top right corner of the cart. You will be able to select which items to move and where to move them.
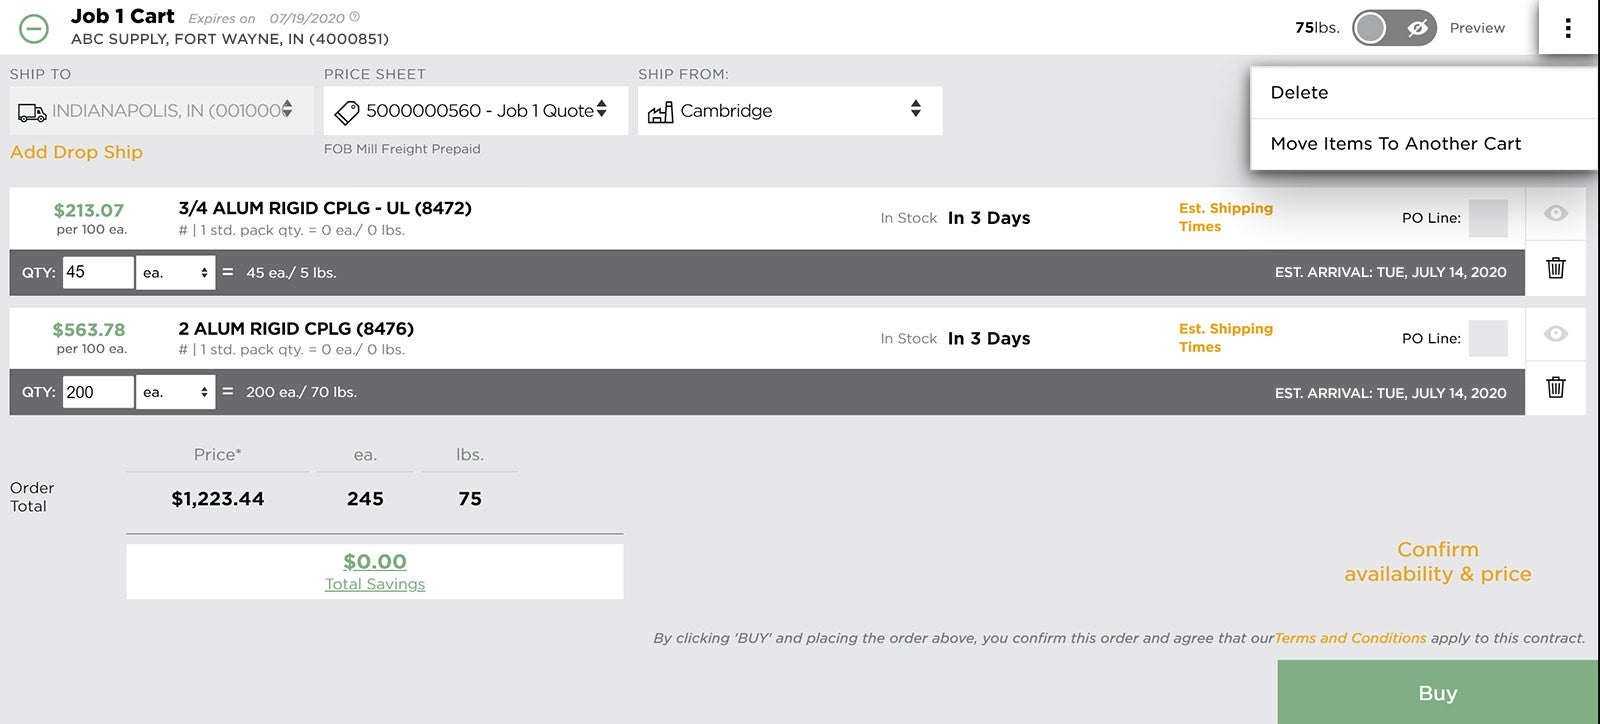
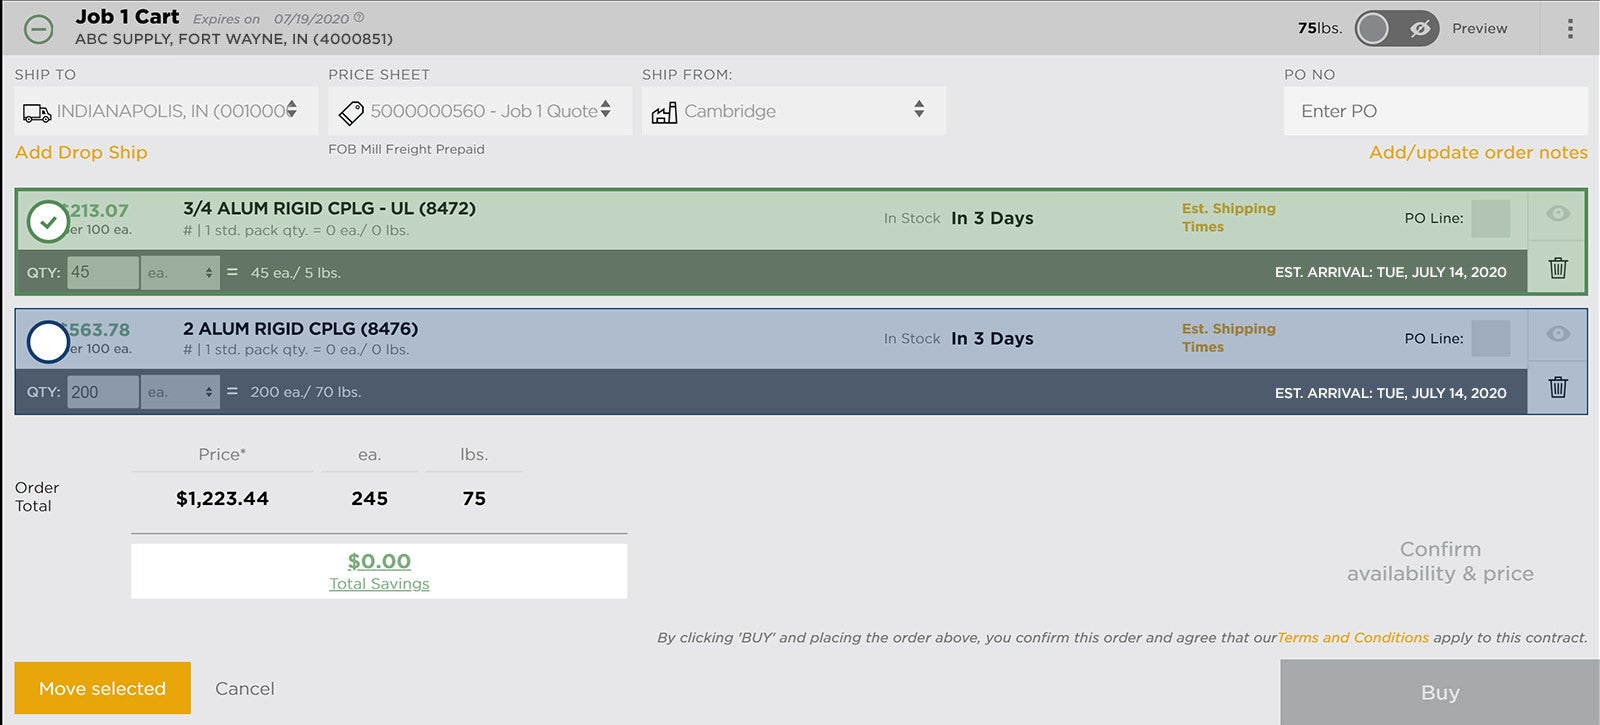
If you select “Move Items To Another Cart” from the menu, you will be able to select which items to move and where to move them. Click the items you want to move, and they will be highlighted in green. Once you’ve selected all the items you wish to move, click the “Move selected” button at the bottom left of the cart.
A list of available carts will pop up. Select the cart you want to move the products to or create a new cart by typing a cart name into the text field and clicking the “+” button.
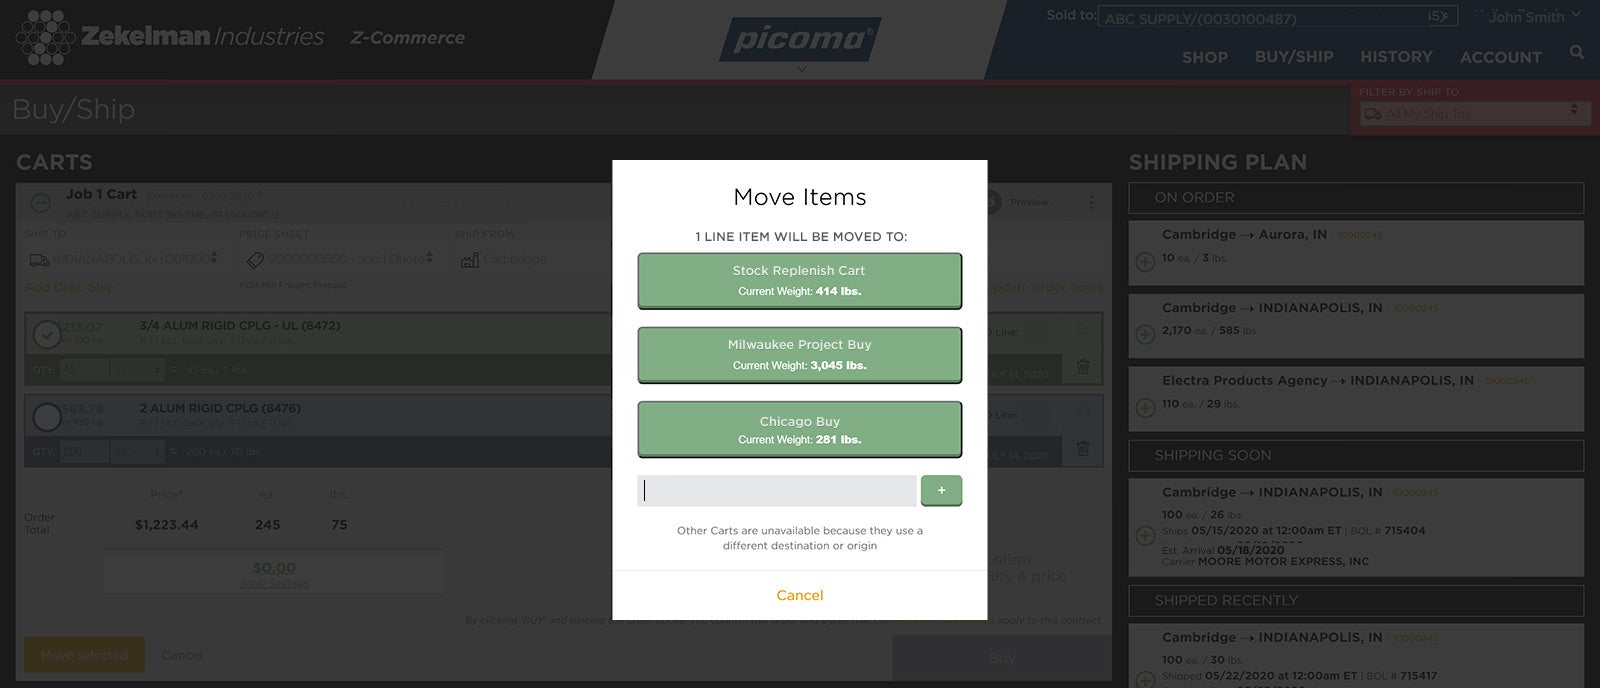
Tip: Not all carts will be available in the list. You will not be able to move items to carts with different branch locations or stocking locations. If you don’t see the cart you’re looking for, try changing the stocking location in the “Ship From” dropdown in your cart to bring up a different list of available carts to move items into.
Tracking Orders
Track orders
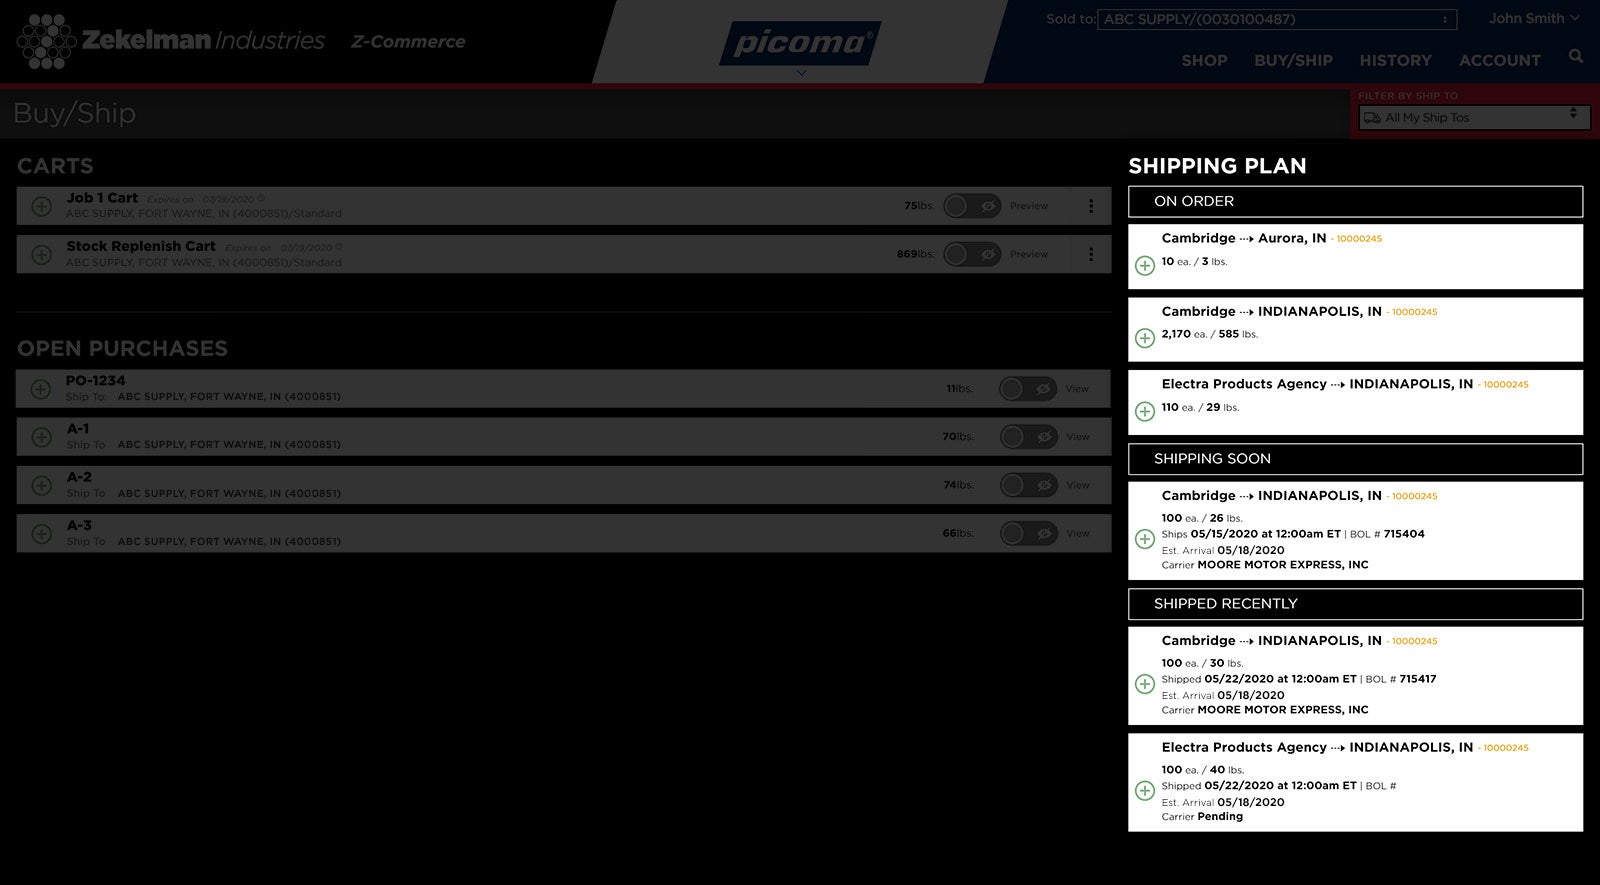
Track order status and shipments by clicking “Buy/Ship” in the main navigation and viewing the shipping plan on the right side of the screen. In each section of the shipping plan you’ll see information about the orders and shipments in each status. Click the icon to expand each order for more details.Orders in the “On order” section of the shipping plan will display product information, the PO number, the quantity and the estimated arrival dates for items in the order. Orders in the “Shipping soon” and “Shipped recently” sections of the shipping plan show the shipping date and time, the bill of lading number, the estimated arrival date, and the carrier.
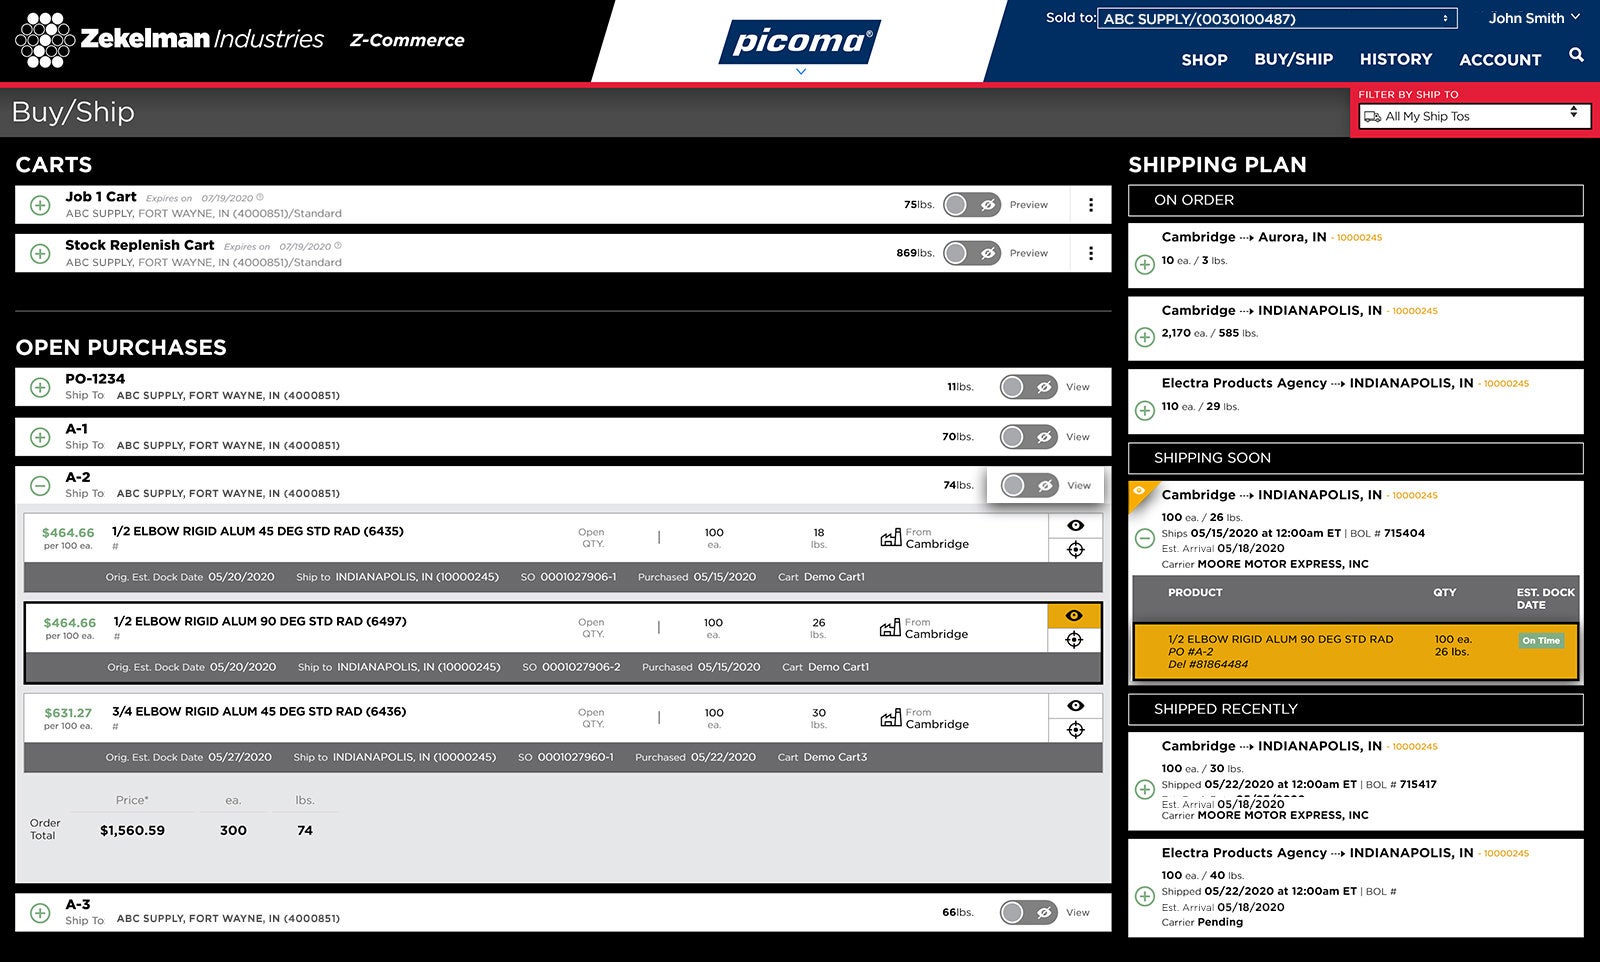
Within your open purchases, click the “View” button to see where the items in that purchase appear in the shipping plan. Or, expand the purchase by clicking the icon then clicking the icon to the right of each product line item to see where each individual product appears in the shipping plan.
On order
The “On order” section of the shipping plan shows orders that have been placed but have not yet shipped. Orders here will display the product name and part number, the PO number, the quantity and the estimated arrival date. If the estimated arrival date for a product has been updated from the date originally estimated when you placed the order, that item will be highlighted in red and display an alert icon to indicate a change.

Shipping soon and shipped recently
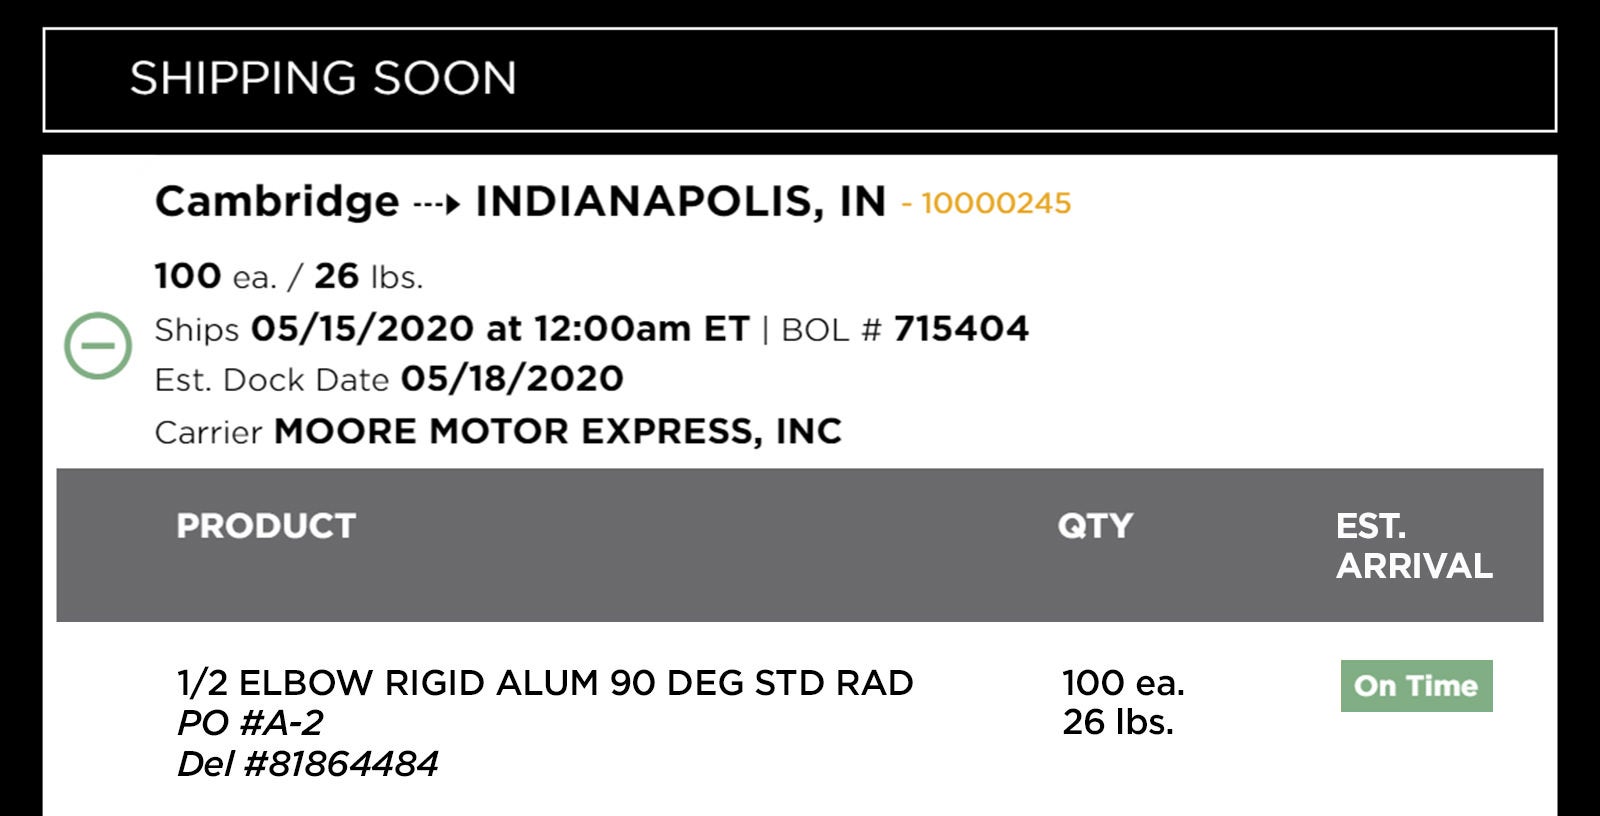
Orders in the “Shipping Soon” and “Shipped Recently” sections show the shipping date and time, the bill of lading number, the estimated arrival date, and the carrier. You can expand each shipment by clicking the icon to see which products have shipped and whether they are on time or delayed.
Tip: If you use Automated Inventory Management (AIM) for any of your products, you’ll see an “AIM” flag marking your auto-replenishment shipments. AIM is Picoma's inventory management program designed to help you stock your key items with ease. With AIM, you can increase inventory turns and reduce inventory costs with automated replenishments of your top-selling Wheatland products. Learn more about AIM.
In the “Shipped Recently” section of the shipping plan, you can track your orders with carriers that are set up with either Zekelman Industries’ GPS tracking system or the carrier’s own tracking system.
A location pin icon in the bottom right corner of an order indicates the order is in transit and can be tracked through Zekelman’s GPS tracking system.
Click on the pin to see a map showing the route the truck is taking to the delivery location along with any planned stops along the way. A “D” icon in the bottom right corner of an order indicates the order has been delivered by one of our tracked carriers.
An envelope icon in the bottom right corner indicates that the order has shipped but real-time tracking is not available.
Click the envelope icon to send an email to your customer service representative requesting the status of the order. Some shipments are tracked through the carrier’s tracking system. Carriers shown hyperlinked in gold can be tracked this way.
Click on the carrier name to open a new page where you can view tracking details and delivery updates.
Orders shipped via FedEx and U.P.S. can also be tracked externally through the carrier website.
Click on the gold hyperlinked carrier name to open a new page where you can view tracking details and delivery updates.
Orders for pickup and orders placed on a customer’s truck will not have tracking capabilities. Please contact your customer service representative if you have any questions regarding orders of this kind.
Order History
See order history
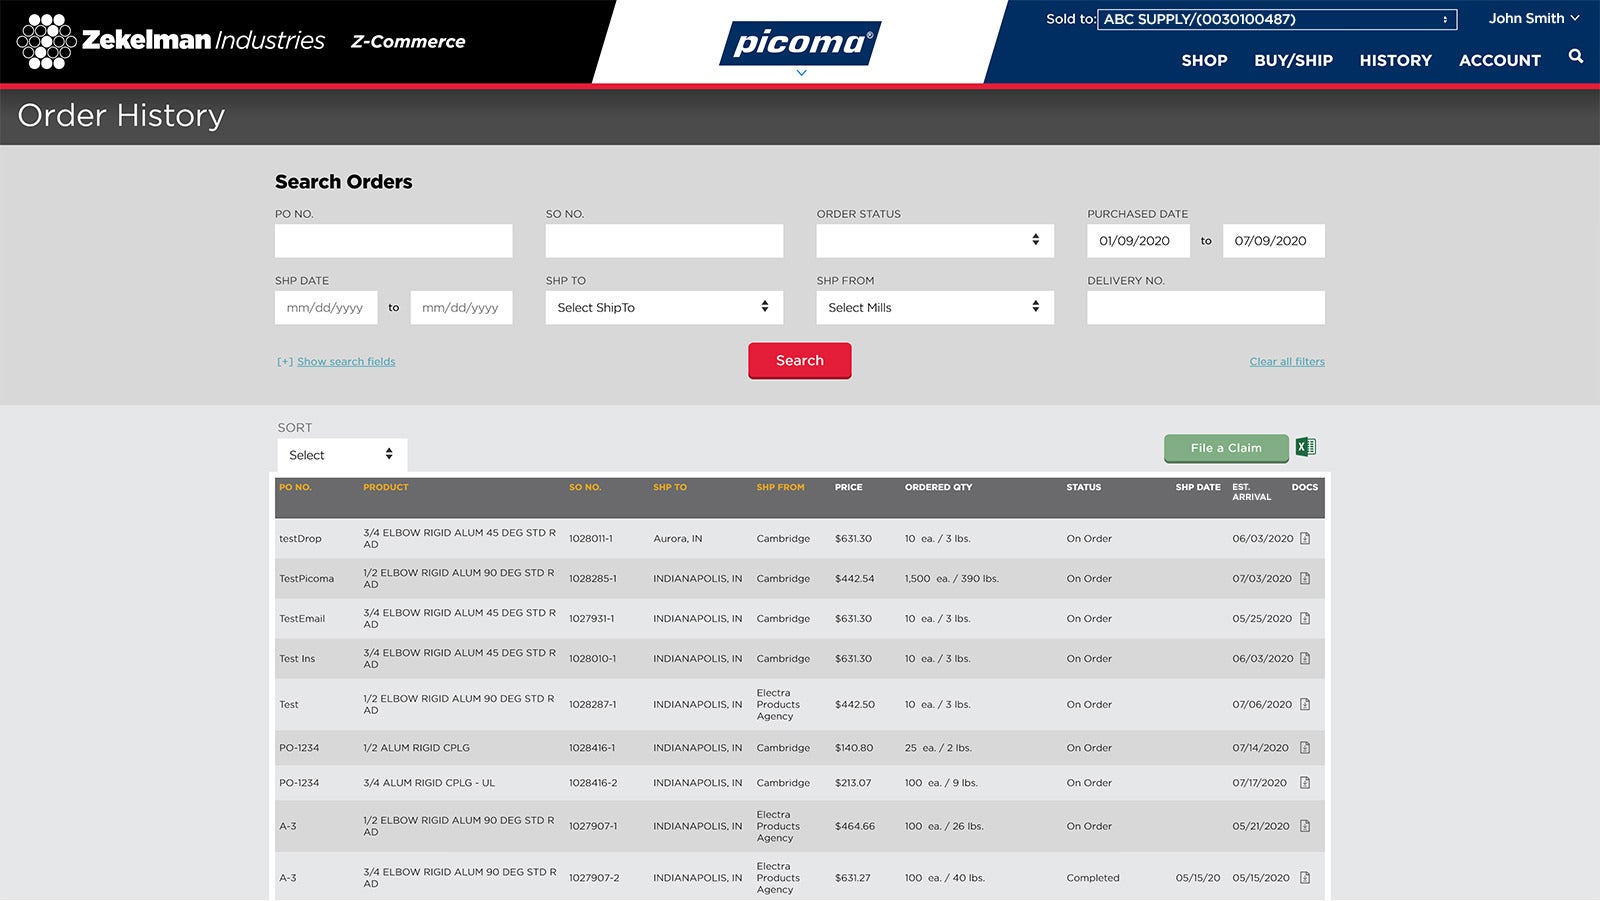
Search for orders by any parameter to view order details. Note that all your past orders from the last three months will be visible here, not just orders placed with Z-Commerce.
Request documentation
Easily request sales orders, bills of lading, packing lists and certifications of compliance for any order placed within the past three months. Click the icon shown under the “Docs” column next to the order to select what type of documentation you’d like to receive. Once you submit your request, you’ll receive an email approximately 5–10 minutes later with the documentation attached.
Tip: Use the “Order Status” dropdown in the search area to quickly filter down to completed orders. Remember that your order history only shows orders placed in the past three months. For orders dating further back, please contact your rep.
My Account
Download price sheets
Under “Account” in the main navigation, select “Download Price Sheets” to access pricing information for all your branches. You can filter by branch location using the “Ship To” filter. If you have contract price sheets available, you’ll also be able to filter by price sheet type — standard, contract or all. Once you click the search button, you’ll see all available price sheets for the branch location and price sheet type you selected. To download a price sheet as a PDF, click the icon to the right of the desired price sheet.
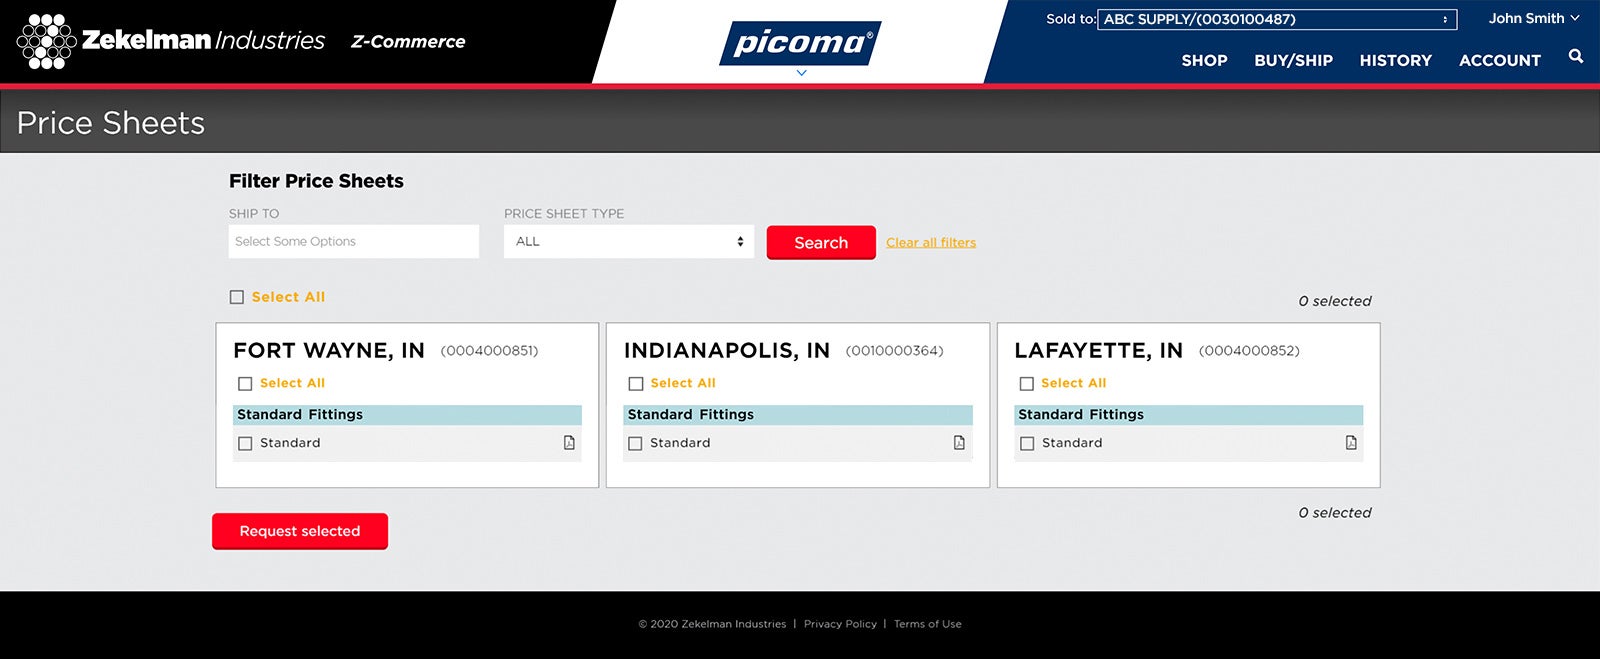
Tip: To receive copies of multiple price sheets at once, mark the box next to each price sheet you wish to receive and click the “Request Selected” button at the bottom of the page. This will trigger an email to you with the requested price sheets attached.
File a claim
If you have any issues with an order you received (e.g., damaged product, short ship, etc.), you can file a claim and submit it to your rep and our customer service team. Under “Account” in the main navigation, select “File a Claim” from the menu. In order for us to process your claim quickly, please enter as much detail into the form as possible.
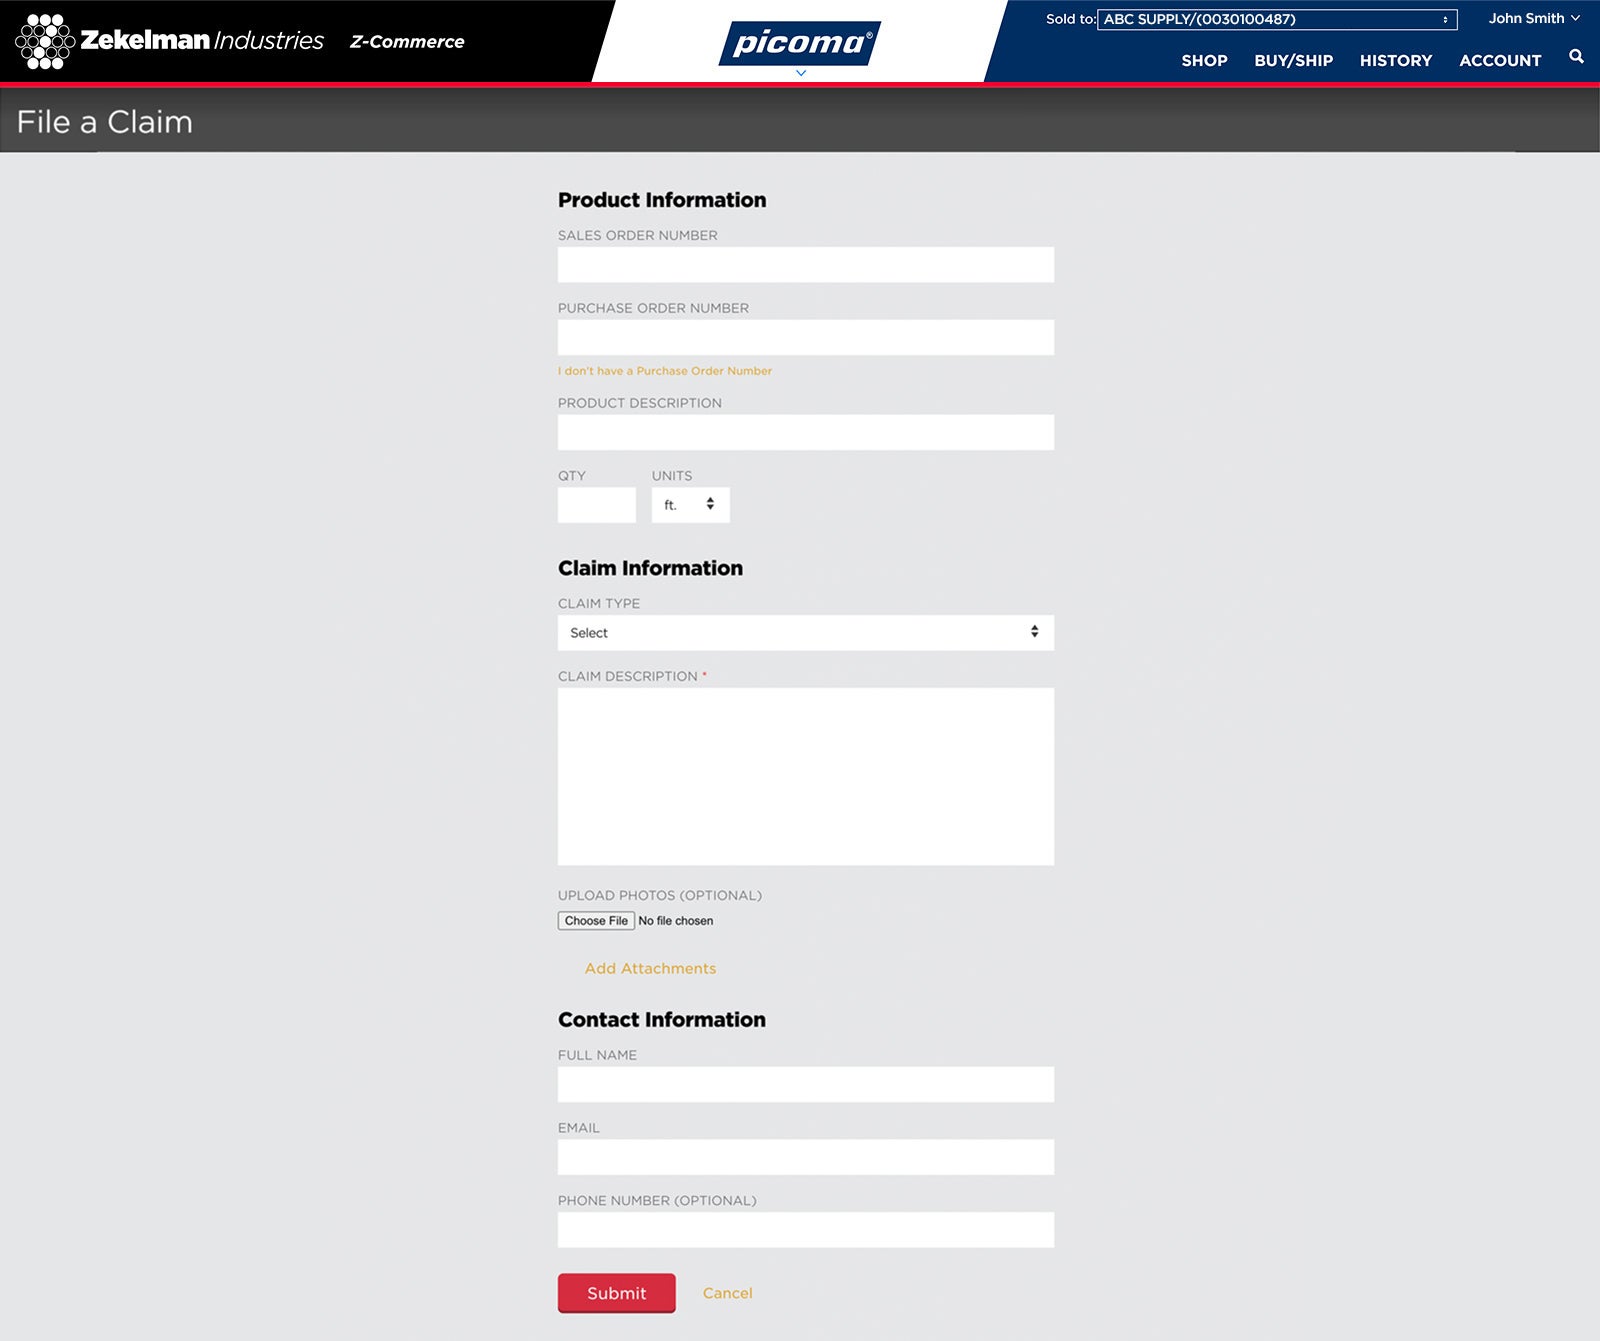
Tip: Upload a photo to help us better understand the issue and process your claim more quickly.
Manage branch locations
If you need to change information for any of your branch locations, navigate to “Account” in the main navigation, and select “Ship-To Management” from the menu. Here, you’ll see all your branch locations. Click the icon to edit the information for that location and click “Submit” at the bottom of the page. This will send a request to a customer service rep who will address the change.
